DiGiCo Remote Control Integration and Mirroring
Below is a troubleshooter for various issues that might occur with DiGiCo consoles while remotely connected to a SuperRack SoundGrid setup. Refer to the DiGiCo section of SuperRack SoundGrid Support notes page for a list of temporary issues in specific versions, some with workarounds.
Waves officially supports the integration with the built-in Waves IO in these consoles:
SD5, SD7, SD8, SD9, SD10, SD11, SD12, Quantum 112, 225, 338, 326, 5, 7 and 852.
DiGiCo software version must be V1143 and higher to remotely control SuperRack SoundGrid.
S21 or S31 consoles cannot remotely control SuperRack SoundGrid.Solo/Output display insert, Loopback, and SuperRack rack name transfer to the console are supported only when using the console’s built-in Waves I/O. These features are not supported when using DMI-Waves cards or SoundGrid-to-MADI I/O devices.
- A host computer with SuperRack SoundGrid SoundGrid software.
- A Waves DiGiCo I/O or DMI card installed (depending on the console model).
- Integration is supported with DMI’s only on SD12!
- At least one SoundGrid Server. A second server can be used for redundancy, and additional servers maybe be used for additional server processing groups.
- A Waves-qualified 1 Gb Ethernet switch.
- A LAN connection (100 Mb) between the console’s Ethernet connector and the SoundGrid switch, which provides communication between the console and SuperRack SoundGrid.
- This is only for remote control; audio is not passed on this connection.
- Both the Waves I/O and the Ethernet ports on the console should be connected to the same switch for a proper setup.
- Quantum series consoles have a built-in network switch.
- Important note: Mirroring is supported only when both host computers run the same OS version, the same version of SuperRack SoundGrid, and the same version of Waves plugins. For example: two computers, each running Windows 10, SuperRack SoundGrid V12, and V13 Waves plugins; or two computers, each running macOS 10.15, SuperRack SoundGrid V12, and V12 Waves plugins.
- Session/Snapshots sync:
Loading a session on the DiGiCo console prompts loading the corresponding session in SuperRack SoundGrid. Same goes for snapshots. Firing a snapshot on the console recalls the corresponding snapshot in the SuperRack SoundGrid session. The Integrated session files are saved in this location:- Windows: C:\Users\Public\Waves Audio\SuperRack SoundGrid SoundGrid\Integrated Sessions
- Mac: Mac HD > Users > Shared > Waves Audio > SuperRack SoundGrid SoundGrid > Integrated Sessions
- Mirroring:
Mirror 2 identical SuperRack setups along with a dual engine console (SD7/Q7/Q852) or with 2 identical single-engine Digico consoles. - PFL/Solo function:
Soloing a channel on a DiGiCo Console will bring the corresponding rack to the front of SuperRack SoundGrid’s screen. This feautre is not supported with SuperRack Performer/LiveBox. - Touch & Turn:
This function allows you to control selected plugin parameters using the DiGiCo console. Control applies to one plugin at a time. - Sync to console global tempo:
This function allows time-based Waves plugins to sync to the console’s global tempo and tempo changes in snapshots. - Lock modes sync:
When locking the console in either unattended or live mode, SuperRack will lock as well.
- Session/Snapshots sync:
In SuperRack SoundGrid version V14.30, a new integration protocol called ProLink was added. It offers the same features along with some improvements, and is based on a newer, more stable & scalable infrastructure. ProLink console remote integration protocol requires SuperRack V14.30 & DiGiCo software V1742.
The legacy integration (supported with DiGiCo software V1143 and above) is still available if you’re running either an older version of SuperRack or the console software but is no longer maintained.
Integrated sessions are saved on the SuperRack SoundGrid host computer and link to sessions with the same names that are saved on the DiGiCo console.
If a session with the same name already exists in the Integrated Sessions folder on the SuperRack SoundGrid computer, the console will send a command to load the session.
If a file of the same name is not present on the SuperRack SoundGrid computer, an empty session will be created. You will need to save the session on the console so that a SuperRack SoundGrid session with the same name will be saved on the computer as well.- DiGiCo ‘.SES’ session files are saved to the console in D:\Projects.
- Integrated ‘.sprk’ session files are saved on the SuperRack SoundGrid host computer in the following location:
- Mac: /Users/Shared/Waves/SuperRack SoundGrid SoundGrid/Integrated Sessions
- PC: C:\Users\Public\Waves Audio\SuperRack SoundGrid SoundGrid\Integrated Sessions
Once a connection has been established, the Remote indicator on the top status bar will turn from grey to green:
When focusing on a plugin parameter and controlling the plugin with the console’s Touch&Turn knob, Remote indicator turn blue:

Note: While in Remote Control mode the Recall Safe, and Scope screens are disabled.
System Alert: Waves is not connected
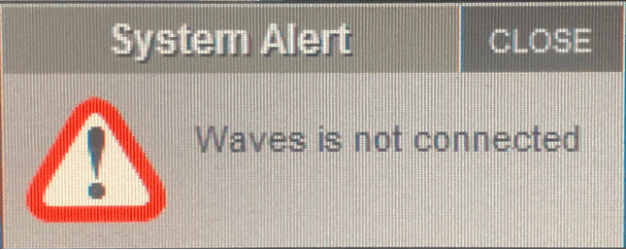
This message pops up when SuperRack SoundGrid is closed or when the computer hosting SuperRack SoundGrid is disconnected from the network.
System Alert: The Waves I/O board has reported an error
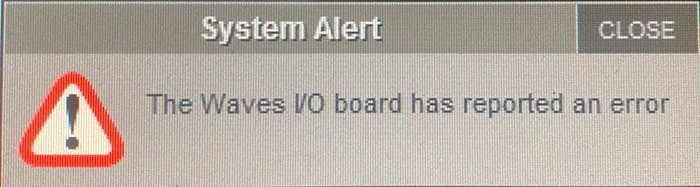
This message will pop up when the I/O is unassigned or disconnected.
If this message appears when connected, replace the cable from the I/O to the switch.System Alert: The Waves SoundGrid has reported an error
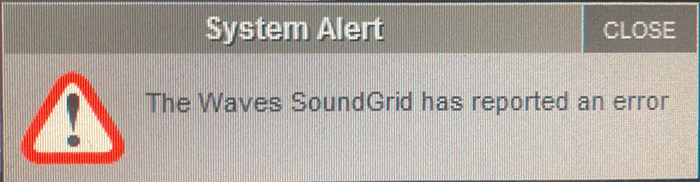
This message will pop up when the SoundGrid Server is unassigned or disconnected.
If this message appears when connected, replace the cable from the I/O to the switch.
- On the SD/Quantum console, go to Options > Console tab and verify that Enable External Waves is set to YES, and that the correct LAN port is selected. Make sure the correct mode (ProLink vs. Legacy) is selected.

- For any change to take effect, restart the console.
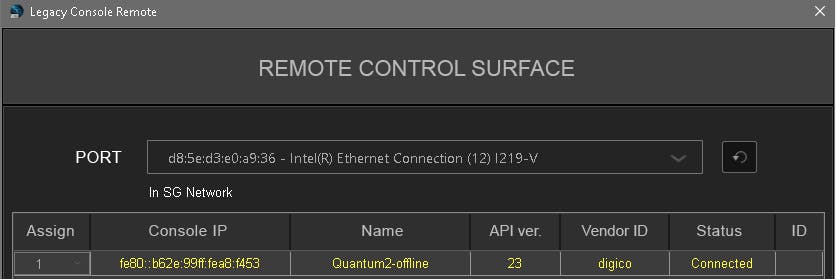
- In SuperRack SoundGrid, go to Setup > Inventory and click the ProLink/Legacy Console Remote Control gearwheel.
- Verify that the SoundGrid port and the Remote-Control Surface Option tabs have the same LAN port selected (Legacy console remote only, ProLink port selection is automatic).
- If the console is on a different network, the console will not be listed in the Remote-Control module.
- Please make sure the time and date on the console are correct.
- Verify that both Ethernet cables from the console’s Ethernet port and the Waves I/O port are connected to the same switch.
- Remote Control needs IPv6 connectivity on both sides. Go to the console’s Windows network settings, and make sure IPv6 is enabled.
Also, make sure that IPv6 preferences on the SuperRack SoundGrid host computer are configured as such:- Mac: System Preferences > Network > Select Automatically under IPv6 settings.
- PC: Network Connections > Ethernet Properties > Internet Protocol Version 4/6.
Obtain an IP address automatically should be selected.
- On the console, Exit to Windows and click on Settings at the bottom to expand it and click on File Browser. Go to C:\Windows\System32\Drivers and make sure that the SoundGridProtocol.sys file is present. If this file does not exist, the SG Driver is not installed on the console. In this scenario, you would need to install the SG Driver on the console.
- Replace the Ethernet cable running from the console to the switch and make sure all connections are solid and that the activity lights are working on the console’s LAN port and on the switch.
Note: This link is 100mb so network activity lights will differ from other SG connections (1Gbps). This is normal. - Access Windows Firewall settings (Control Panel > Firewall > Allow an app or feature through Windows Firewall) and make sure that nothing from Waves/SoundGrid is blocked.
- Make sure that there is no Anti-Virus/Malware software running on your computer.
- On the console, go to D:\(console model) and make sure the file DiGiCoWavesDLL.dll exists.
- Legacy console remote only: On the console, go to D:\(console model) and locate a file named RemoteMultiRackAG.dll. Right-click and select Properties. Under the Details tab, make sure that this file matches the file size of the dll version (Version 9.80.13.1048 / 3,226 KB). If the file is not present or has the wrong size/version, please contact our support team.
- If all the options above have not worked, the last resort is to re-install the DiGiCo software on the console.
- On the SD/Quantum console, go to Options > Console tab and verify that Enable External Waves is set to YES, and that the correct LAN port is selected. Make sure the correct mode (ProLink vs. Legacy) is selected.
This means there’s a mismatch between the selected integration protocol in SuperRack & the console. Hovering with your mouse above the console listing will show you the reason.
- If you’re using ProLink console remote in SuperRack, make sure the console is set to ProLink mode and power cycle the console for the change to take effect.
- If you’re using Legacy console remote in SuperRack, make sure the console is set to Legacy mode and power cycle the console for the change to take effect.


Recalling/firing snapshots on the DiGiCo console will recall/fire the corresponding snapshots in SuperRack SoundGrid.
If snapshot integration doesn’t work, follow these steps (even if session snapshots are matched and remote control is engaged on the console):
- Go to the Snapshots menu,
- Click on Global Scope (top left)
- Make sure Waves is enabled.
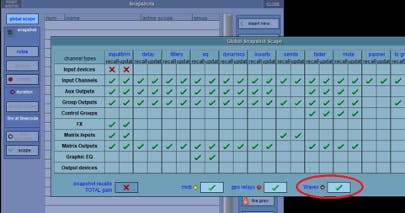
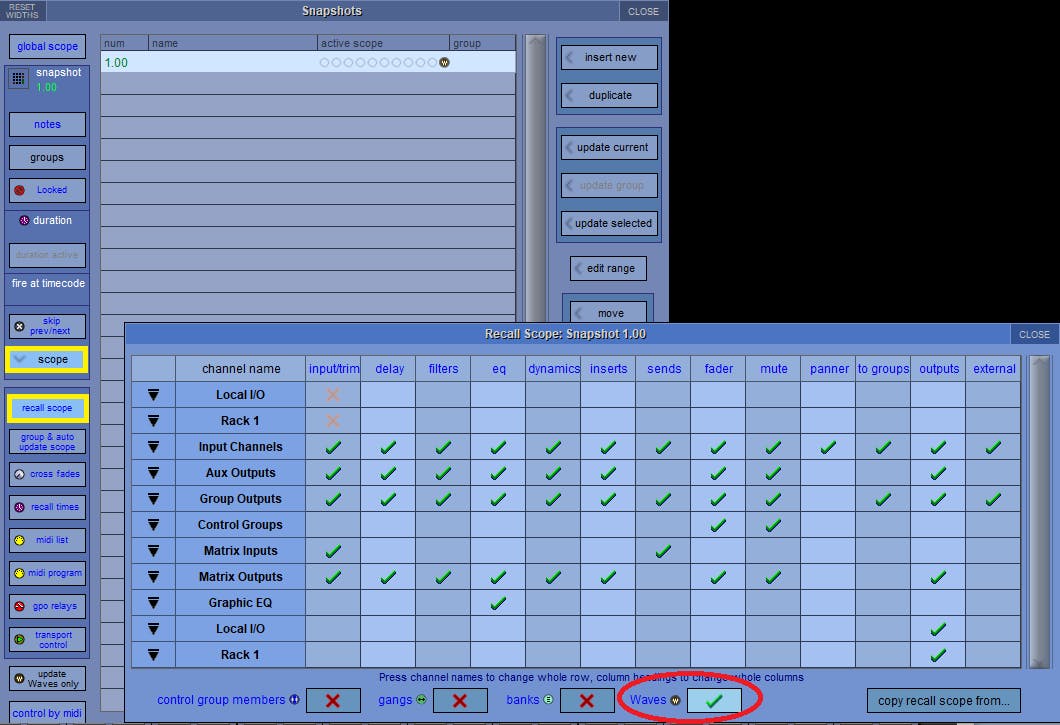
- If it still doesn't work, check that under Scope > Recall Scope page of each individual snapshot includes Waves.
Soloing a channel on the DiGiCo Console should show the corresponding rack in SuperRack SoundGrid. In case this feature does not work properly:
On the console, go to Options > Solo.
Under Solo Displays Insert and Output, select Insert or Output, or both – whichever suits your needs.
Still, at least one option must be selected in order for this function to work.
If you are using another I/O (I.e DiGiGrid MGB) and not the Waves I/O, this feature will not work.
This feature is not supported when using two DMI cards.
This feature is not supported with SuperRack Performer/LiveBox.When a DiGiCo console is remotely controlling SuperRack SoundGrid, session management is handled by the console.
When loading a session, a the DiGiCo console will send a command to SuperRack SoundGrid to load the session with the corresponding name in the integrated sessions folder.
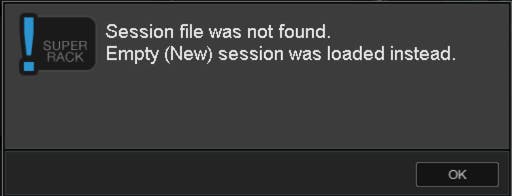
This will override the current SuperRack SoundGrid session (but leaves the inventory as is).If there is no session with a corresponding name, SuperRack SoundGrid will load a new, empty session.
If you are preparing a SuperRack SoundGrid session before setting up Remote Control, please follow these steps to ensure proper integration:
- Save the session.
- Close SuperRack SoundGrid.
- Move the session to the Integrated Sessions folder and change its name to match the DiGiCo session name.
Important note – If this session (prepared prior to mirroring) includes snapshots, verify the Snapshot naming convention matches the DiGiCo numbering and naming convention as described in step 3 below. If it does not match, complete steps 1-3:
- Make sure Remote Control is OFF in SuperRack SoundGrid, and that you have the same number of snapshots in SuperRack SoundGrid and on the DiGiCo session.
- Back up your original SuperRack SoundGrid session and save a new copy of the session with the exact same name as your DiGiCo session (.ses) file.
- Rename your SuperRack SoundGrid snapshots exactly as the DiGiCo Snapshot’s num & name. For example:
- 1.00 First Song
- 2.00 Second Song
- 6.50 Sixth Song B part
‘Save Session As’ this SuperRack SoundGrid session to the following location:
- Windows: C:\Users\Public\Waves Audio\SuperRack SoundGrid SoundGrid\Integrated Sessions
- Mac: Mac HD > Users > Shared > Waves Audio > SuperRack SoundGrid SoundGrid > Integrated Sessions
Now you can set up the Remote-Control connection between the DiGiCo and SuperRack SoundGrid.
This error occurs when:
- Mirroring is enabled, then turned off or disconnected, and changes are then applied to one of the SuperRack SoundGrid/DiGiCo sessions.
- If the two consoles are running different sessions. (Sessions may be named the same with different content).
When sending the session from one SuperRack SoundGrid to another via the Network tab of the console, the session file is transferred over the network to the second SuperRack SoundGrid computer. Once saved, it will reside in the integrated session folder.
- In the Network tab of the DiGiCo console, press Send Session/Receive Session and mirror it (from/to select, depending on the scenario).
- Check if there are any IR plugins from the IR reverbs family. Mirroring could fail if custom IRs are used as these files need to be transferred over the network.
- Copy the session and the custom IR files (if they exist) to the integrated session folder on the second computer.
- If the issue occurs only on a specific session, make sure the names of both sessions (.sprk and .ses) are identical on both engines and that they are both found in the Integrated Sessions folder.
- If the issue persists, save the session to a new session file (File > Save Session As) and try to mirror it.
- Perform a complete re-installation of the plugins and SuperRack SoundGrid.
If none of the above resolved the issue, the issue may be caused by a mismatch between the snapshots in the session, in which case, the please verify which session includes the appropriate/correct snapshots and manually copy them from one computer to the other.
If there’s a mismatch between the license activated on the ‘mirrored-from’ system and the licenses on the ‘mirrored-to’ system, you might get a license error. Make sure both systems have the exact same licenses activated.
- Make sure everything is connected and set up properly, as described in the following articles:
- Once verified, go to SuperRack SoundGrid Setup page. Under Controllers, open the Mirror Control menu. Click on Reset Broken Mirroring. Try to mirror again.
This is normal when using Legacy console remote starting from SuperRack V14.30.
None of the above worked? Contact Technical Support.