How to Use Proton Duo with DiGiCo SD Series Consoles
Waves Proton Duo computers are equipped with a 4-port built-in ethernet switch.
In order to establish remote control of SuperRack SoundGrid running on a Waves Proton Duo computer, and using the built-in switch and a DiGiCo SD Series console*, the console’s network interface controller (NIC) must be configured to run at 100Mbps speed (Full Duplex).
*Does not apply to DiGiCo Quantum Consoles
There are three steps to this procedure. Complete them in this order:
- Disable ReadyOn
- Modify the Network Settings
- Enable ReadyOn
Step #1 – Disable ReadyOn
The operating system on your SD console is protected by ‘ReadyOn’. As long as ReadyOn is enabled, any changes made to the system (including Network and Display Settings) will be lost when the SD Console is switched off.
Important note:
Connect a working overview monitor to the console for this procedure or it may become disabled after ReadyOn is re-enabled. (Does not apply to SD7).If you wish to try this procedure before committing to the changes, leave ReadyOn enabled and skip to Step #2. Changes can then be made, and the system tested, without these changes being permanent.
- If you are in the mixer application, quit to Windows:
- SD7 - System > Quit to Windows.
- Other SD models - press [Alt]+[F4].
- Right-click on the Start button and select Explore.
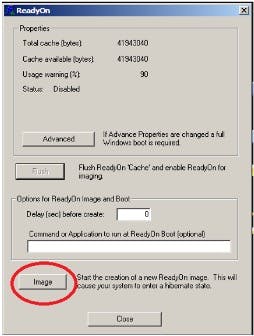
- Go to C:\Program Files\Ardence\ReadyOn, and run ReadyOn.exe The following window will appear:
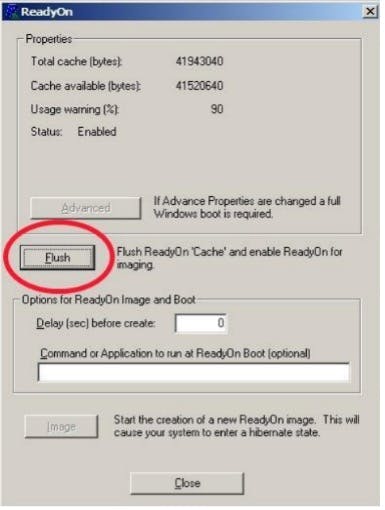
- Click on the Flush Button, as indicated above. The following progress bar will appear. Once Flushing is complete, close ReadyOn.

Step #2 - Modify the Network Settings
The following changes must be made to the LAN port settings of your SD console:
- Right-click on the Start button and select Explore.
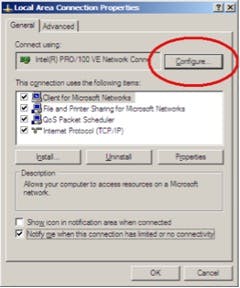
- Go to Control Panel > Network Connections. Right-click on Local Area Connection and select Properties.
- In the window that opens, click on Configure as shown in the picture below.
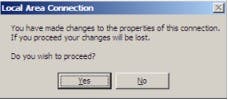
- When you click Configure the following warning message may appear. Select Yes.
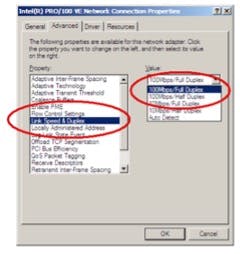
- In the Intel® Pro/100 VE Network Connection Properties Window that opens, under Advanced select Link Speed & Duplex, and set its Value setting to 100Mbps/Full Duplex. We encourage you to contact Waves Live Support and report any issue you may encounter.
- Click OK.
Important note:
If mirroring mixers, engines must be set to the same Link Speed & Duplex value (i.e. 100Mbps/Full Duplex).If the IP address is to be changed, this can be done at this point under Internet Protocol (TCP/IP). Refer to the mixer user manual for the limits on the range available. There is normally NO reason to change this setting and doing so can prevent all network operation.
Step #3 – Enable ReadyOn
- Right-click on the Start button and select Explore.
- Go to C:\Program Files\Ardence\ReadyOn and run ReadyOn.exe.
- Close any Explorer windows that are open behind the ReadyOn window so that the only window open on the screen is the ReadyOn window, as shown below.
- Click the Flush button.
- In the “Command or Application to run at ReadyOn Boot” field, type the following path:
- SD7 - D:\SD7\SD7.exe.
- Other SD models – D:\SDX\SDX.exe (replace X with the SD model number).
- Click on Image. The screen should show the System Hibernating.NOTE: If there’s an error message at this point, OK the error and close the ReadyOn program. Quit and restart Windows (Start button > Turn Off Computer). The console will restart and then halt at the Windows desktop (the network settings will not be changed by this restart). Now, repeat the above procedure starting from Step #3 onwards.
- Once this procedure is complete and the system has hibernated, turn the console power off. You can now power the console back on and proceed as normal.NOTE: There are two lights on the console’s Network Interface Card (Except for SD7 where these are internal) After this modification, the orange light should be permanently lit to indicate the presence of a 100Mbs connection. The green light will flash to indicate network activity. The minimum requirement for a remote PC network adaptor is 100Mbs.
If the above configuration does not work and the console is not assignable in the Remote Control window of SuperRack, then you can use a qualified network switch to connect all components. In such conditions, the console can be kept in its default NIC setting (Auto Negotiation) or use 100MBps Full Duplex.
For further assistance with the console's configuration, please contact DiGiCo directly.
Learn How to Setup SuperRack SoundGrid with DiGiCo SDx Consoles with Remote Control.