How to Use SoundGrid Studio for Real-Time Monitoring & Plugin Offload
Important Note:
The last version of StudioRack is V14. It is also the last version to support integration with SoundGrid Studio and offloading processing to a SoundGrid server.
If you use StudioVerse Audio Effects and wish to install StudioRack V14 - Refer to the How to Roll Back StudioVerse to StudioRack V14 for SoundGrid Offloading Article.
The last version of Waves plugins supported in StudioRack is V14.
Learn how to set up SoundGrid Studio application and StudioRack plugin to offload plugin processing, record using real-time monitoring and stream multi-channel audio to and from your DAW using a SoundGrid Server, SoundGrid Interface, Switch and Driver.
What you need:
- A computer running Windows or Mac (see system requirements), with the SoundGrid Studio and the StudioRack plugin chainer, installed and licensed on the computer (or on a USB flash drive)
- SoundGrid-compatible plugins, installed and licensed on the computer (or on a USB flash drive). (See Installation and license activation instructions.)
- If the computer does not have an Ethernet port, an approved Ethernet adapter.
- One (or more) SoundGrid audio interface/s
- A SoundGrid qualified 1 Gigabit Network Switch
- A SoundGrid Sever
- Three (or more) supported Ethernet cables
Hardware Connections
- Using supported Ethernet cables:
- Connect the switch to your computer’s Ethernet port (or adapter)
- Connect the SoundGrid interface/s to the switch
- Connect the SoundGrid Sever to the switch
- Connect any microphones, instruments, monitors and/or headphones you wish to use, to the SoundGrid Interface.
- Make sure all devices are powered and turned on.
SoundGrid Studio Configuration
The first time you launch SoundGrid Studio, the Auto-Config Wizard will automatically scan the network and configure your system.
Here’s what it will do:
- The Wizard will identify the host computer LAN port, if more than one valid LAN port is present, you will be prompted to choose the correct one. If you can’t identify the correct network port, please refer to this support article.
- The Wizard will scan the network for devices and assign them to your system inventory. Notice the “Add to SoundGrid Studio?” prompts asking to add the devices to the SoundGrid Network on the top right of your screen. In this case you should see prompts for your Soundgrid Interface and Server, click ‘Yes’ on each to add them.
- The Wizard will update any device firmware if needed. If a device (I/O or server) firmware is out of date, the wizard will automatically update it to match your SoundGrid Studio software version. When an I/O firmware update is finished, you will be prompted to turn the device off and on, please do so.
- Depending on the order that the system identified the devices, and the order you clicked ‘yes’ to add them to SoundGrid Studio, the Wizard will patch hardware and software interface (i.e. SoundGrid driver) inputs and outputs.
Once done, you should have a fully working SoundGrid system. If SoundGrid Studio encounters problems with configuration or requires your attention, prompts will guide you to the appropriate solutions.
- You can view the devices and their settings in the Setup Page and view or edit the patch between the hardware and software interfaces (i.e. SoundGrid driver) in Patch page > Device to Device view.
- You can save and manage your sessions in the top left ‘hamburger’ menu.
Basic DAW Configuration:
- Launch your DAW and access it’s settings dialog.
- Select ‘Waves SoundGrid’ as the ASIO (Windows) or Core Audio (Mac) driver, for input and output where applicable.
- On a macOS, go to Settings > Security & Privacy > Privacy tab and check ‘SoundGrid Core Audio Service’ to give access to (any) microphone. More info.
- Access your DAW’s I/O setup or configuration and refresh to reflect the new inputs and outputs from the SoundGrid Driver.
- Set up mono or stereo tracks to record in your DAW and assign channels coming in from the SoundGrid Driver. Configure your host application’s outputs as necessary:
- If you wish to mix or sum these channels in your DAW and stream a Stereo output back to the SoundGrid Interface, set the outputs to ‘emoST Control Room A L/R (Stereo)’.
- If you wish to mix or sum these channels on a console or a different DAW, set the outputs to individual or pairs of channels as desired.
- Play back audio from your DAW via your SoundGrid Interface’s outputs, it is passing through the Control Room monitoring section of the eMotion ST Mixer, where you can control the monitoring level and additional routing and processing.
Up to this point we have set up a basic multi-channel audio stream to and from your DAW.
If you wish to offload plugin processing to your SoundGrid Server or use the low-latency monitoring capabilities of SoundGrid studio and StudioRack, please follow the steps below.
Configure StudioRack to offload plugin processing and record using real-time monitoring:
- Load the StudioRack plugin (from your DAW’s insert point > ‘Effects’ category) on all relevant tracks.
- Assign SoundGrid driver inputs to the tracks you wish to record to, arm the tracks and record the audio incoming from your SoundGrid interface.
- If SoundGrid Studio has been configured properly – StudioRack should display that it is in ‘SG’ Mode (vs. ‘Native’), and the ‘SG’ icon will be green. If the ‘SG’ icon is red, something is not configured properly – click it and the application will indicate what to address.
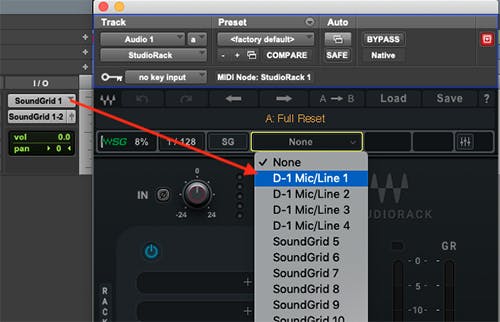
- On the SoundGrid Toolbar, choose the same input assignment (default setting is ‘none’) matches the assignment as the track in your DAW. This must be done manually on each instance of StudioRack.
- Click the menu that reads ‘PB’, there are three options here – select ‘Auto’. This feature is supported in most DAWs, but not in Bitwig Studio, FL Studio and Ableton Live, where you will have to switch between Input and Playback (PB) Modes manually. Do not set tracks you do not wish to record to ‘Auto’ mode.
- By clicking ‘Group’, you can group StudioRack instances in different tracks together so when you toggle one from Playback to Input and vice-versa, all instances assigned to the group will toggle as one (for instance when recording drums, you will want all drum tracks to switch to Input together).
- In most DAWs, you can set up the DAW transport to control StudioRack’s Input/Playback mode, by setting up ‘Mackie HUI’ control. Learn how to set up your DAW to do this here. This feature is supported in most DAWs, but not in Bitwig Studio, FL Studio and Ableton Live, where you will have to switch between Input and Playback Modes manually.
- Load a plugin or chain of plugins in StudioRack, you can also insert parallel or split crossover racks for elaborate custom effects.
- Record the incoming audio from your SoundGrid interface – the plugin processing you hear being handled by the Soundgrid server. The signal you are recording in your DAW is dry. StudioRack should be in ‘A Input’ mode.
- All monitoring is handled via the monitoring section of the eMotion ST Mixer, where you can control the monitoring level and additional routing and processing.
- Click the Mixer icon in StudioRack to display the eMotion ST Mixer. Switch to the ‘StudioRack’ layer to control monitoring and send levels (by selecting Aux or Mon layers).
- Play back the audio you just recorded, the plugin processing you hear is still being handled by the Soundgrid server over of the dry, recorded (or imported) audio. StudioRack should be in ‘A PB’ mode.
- Once you are done recording, change all StudioRack instances play to ‘Playback’ mode.
- Leave the StudioRack instance/s in your session and take advantage of its advanced chaining and macro capabilities, while using the server for extra processing power.
- Choose one of the two methods to monitor your DAW playback and StudioRack inputs, as advised in step #4 above:
- If you wish to mix or sum these channels in your DAW and stream a Stereo output back to the SoundGrid Interface, set the outputs to ‘emoST Control Room A L/R (Stereo)’.
- If you wish to mix or sum these channels on a console or a different DAW, set the outputs to individual or pairs of channels as desired.
Note that all StudioRack outputs are assigned to L/R ‘Main’ bus of the eMotion ST Mixer. This too is automatically routed to SoundGrid Studio’s control Room source. The two sources (Your DAW output and the Mixer’s) are fed together to the control room ‘Source’ section, where you can trim the level as if you need to apply extra balance between the two sources. Just make sure both sources are ‘On’.
The Same concept can be applied for the musicians in the Live Room. Feed the Headphone Matrixes with the stereo output from your DAW and add the Aux bus you are using for the personal Headphone mix.
For more complicated headphone mixes, you can stem tracks out from your DAW into the mixer channels . Set levels as you wish for the control Room via the faders and personalized headphone mixes on the Aux sends.
More capabilities:
You can connect more SoundGrid Interfaces and more computers with DAWs (and SG Studio installed) to this network for elaborate networking and routing, including the possibility to patch sound going directly from device to device or to mix audio coming from various sources, applications and computers using the eMotion ST Mixer.
Each new device you add will be automatically patched by the Auto-Config Wizard, but you can also adjust the patch and device settings as you wish, manually.
For advanced networking and streaming audio between DAWs, or mixing DAW outputs using SG Studio, please refer to the SoundGrid Studio User Manual.
Need more assistance? Contact Waves Technical Support.