How to Use MIDI to Trigger Scene Changes on eMotion LV1 Classic Console
The eMotion LV1 Classic console can receive MIDI Program Change messages from a computer to trigger scene changes. This is achieved using the RTP-MIDI protocol to transfer MIDI over a network.
Follow the steps below:
Install rtpMIDI on the eMotion LV1 Classic Console
- On a computer that’s connected to the internet, download rtpMIDI from this link.
- Copy the rtpMIDISetup.zip file that you downloaded to a USB storage device.
- Connect your USB storage device to any available USB port on the eMotion LV1 Classic console.
- In the mixer, go to the Setup tab and click on the ADMIN button at the bottom left to access the Admin Kiosk window.
- In the Admin kiosk, under External Drives, select your USB storage device.
- Right click on the rtpMIDISetup.zip file, choose Extract All and click on Extract.
- Double click on rtpMIDISetup.exe.
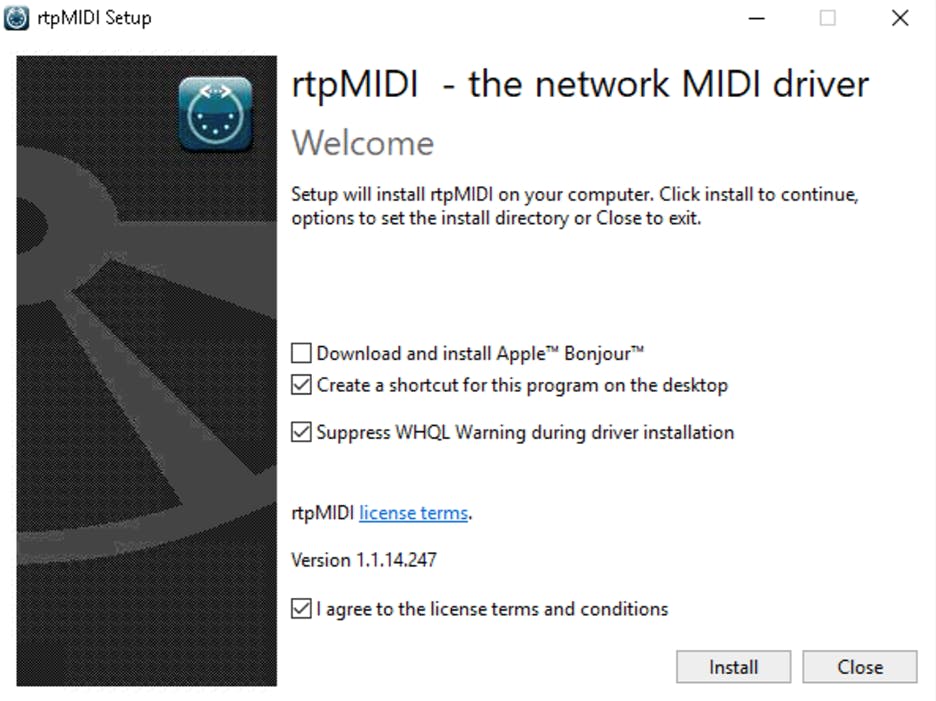
- In the rtpMIDI installer window:
- Make sure to un-check ‘Download and install Apple™ Bonjour™.
- Make sure you read and agree to the rtpMIDI license terms and conditions.
- Click Install.
Set Up Your eMotion LV1 Classic Console’s rtpMIDI session
Once rtpMIDI has been installed, launch it from the Admin Kiosk:
- In the mixer, go to the Setup tab and click on the ADMIN button at the bottom left to access the Admin Kiosk window.
- In the Admin kiosk, press the cogwheel icon (on the bottom right) to access Advanced Administrator mode.
- Click on Utilities and select rtpMIDI
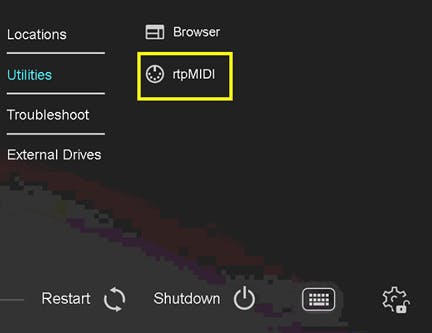 (Wait for a few seconds for the rtpMIDI window to appear).
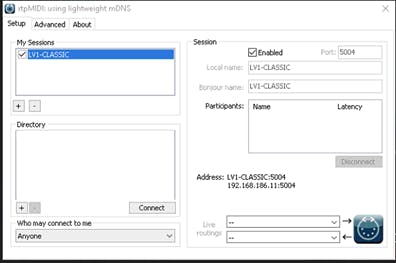
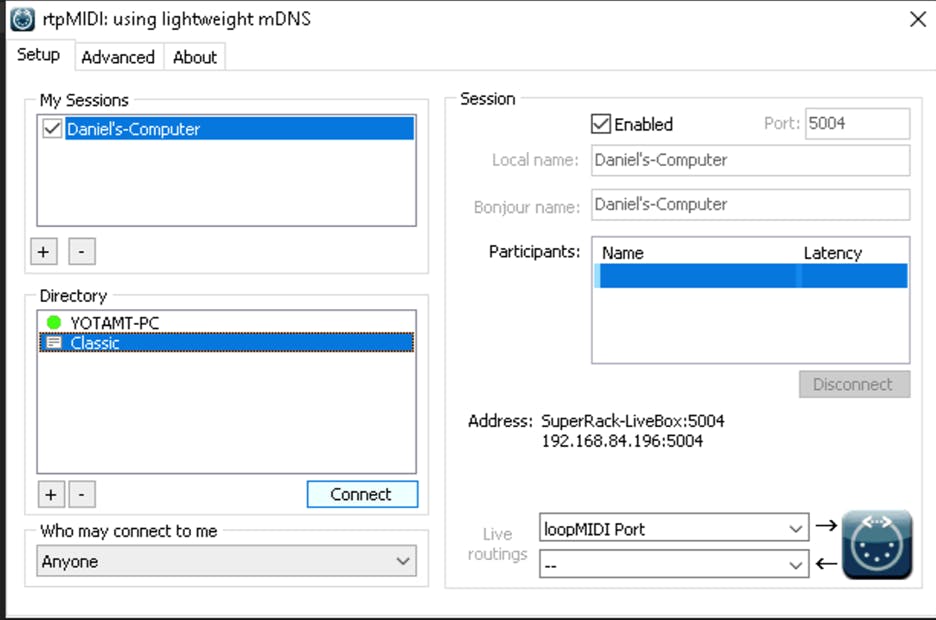
 - Under ‘My Sessions’ (top left) click on the + button to create a new session.
- Under ‘Session’ (top right) checkmark ‘Enabled’.
- Make sure that:
- Port is set to 5004.
- Under ‘Who may connect to me’ make sure ‘Anyone’ is selected.
 Note: When enabling the session by check-marking 'Enabled', you may see the following message: "Bonjour service creation failed with: -65548".
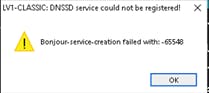 You can safely disregard this message and proceed by clicking OK, as the connection will still work if you configure and establish the connection manually as per this article instructions. Bonjour is only required for automatic device discovery.
At this point, the eMotion LV1 Classic console’s rtpMIDI session is ready to receive a connection from a participant.
Establish a network connection between the computer and the console
- Connect an Ethernet cable between the computer and the eMotion LV1 Classic Console’s normal network port. This can be done either through a network switch or via a direct Ethernet connection.

- Notes:
- Do NOT connect the computer to the SoundGrid ports.
- It is also possible to use a USB-To-Ethernet adapter instead of the built-in network port. If you do so, make sure to connect it to the USB 3.0 ports at the back (blue ports).
- Notes:
- Configure Static IP and establish a connection between both entities:
- On the eMotion LV1 Classic Console:
- In the mixer, go to the Setup tab and click on the ADMIN button at the bottom left to access the Admin Kiosk window.
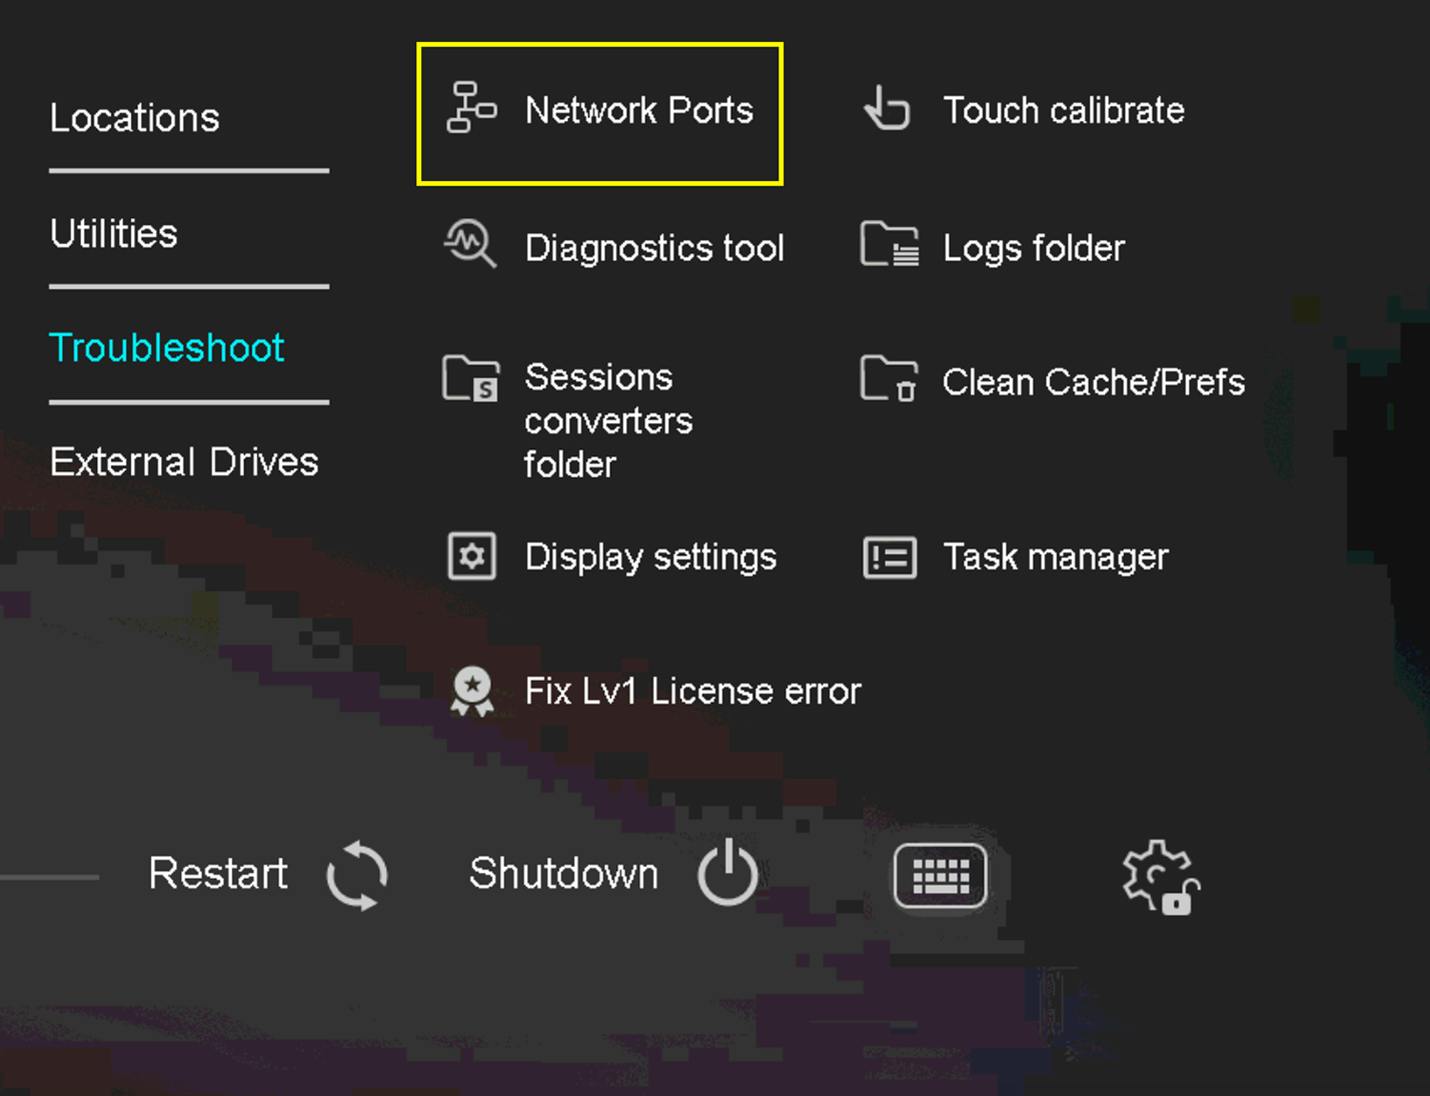
- In the Admin kiosk, press the cogwheel icon (on the bottom right) to access Advanced Administrator mode.
- Go to Troubleshoot and click on Network Ports.
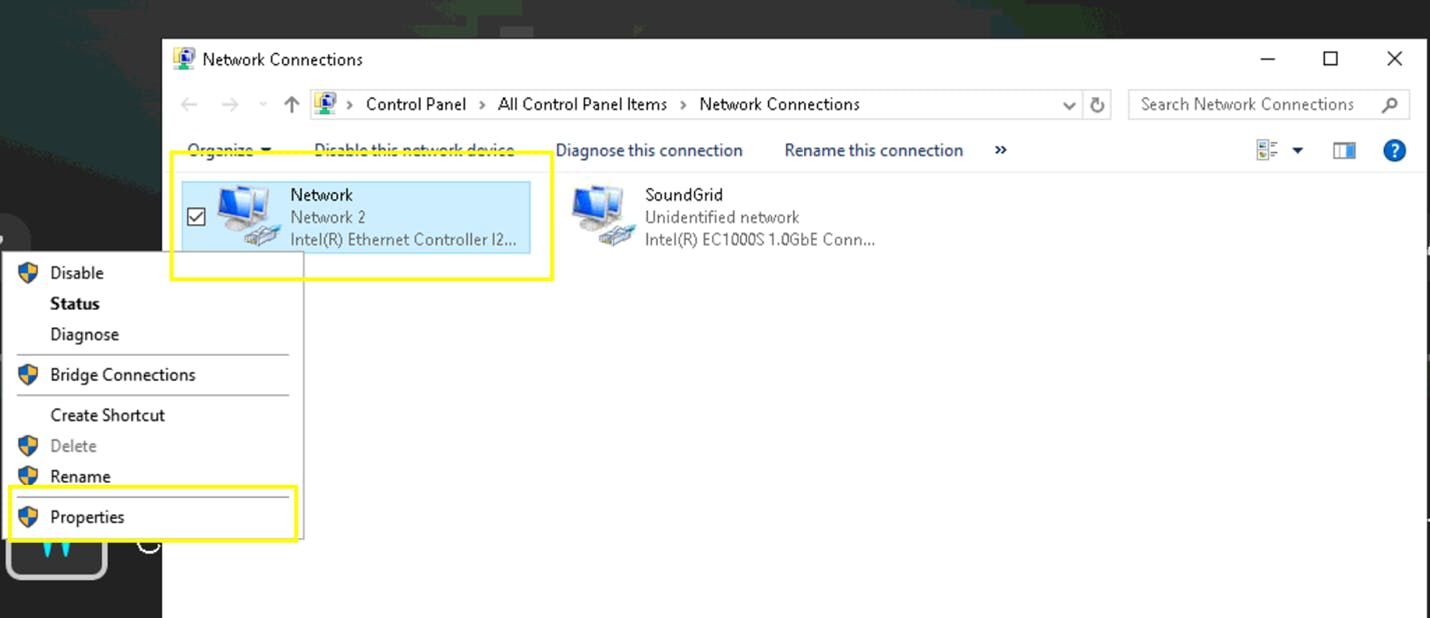
- In the Network Connections window, locate the Network ports' NIC (Network Interface Controller) and make sure it is enabled. Do not select the SoundGrid ports' NIC.
- Right-click the Network ports' NIC and click on Properties.
- Double Click on IPv4 settings.
- Check ‘Use the following IP addresses’.
- Set (example):
- IP Address: 192.168.1.1
- Subnet Mask: 255.255.255.0
- Leave Default Gateway blank.

- Click OK.
- On the computer you wish to trigger MIDI PC messages from:
Windows:- Open the Network Adapter Settings, locate the relevant NIC and navigate to its IPV4 settings.
- Check ‘Use the following IP addresses’.
- Set (example):
- IP Address: 192.168.1.2
- Subnet Mask: 255.255.255.0
- Leave Default Gateway blank.
- Click OK.
- In macOS System Settings navigate to Network settings.
- Locate and select the relevant NIC.
- Click on ‘Details’ and navigate to its TCP/IP - IPV4 settings.
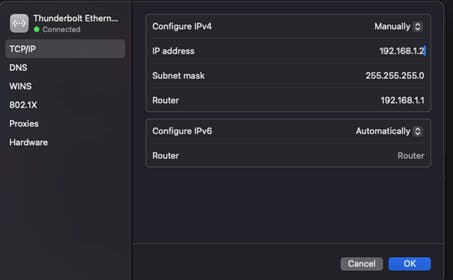
- Under Configure IPV4 select ‘Manually’.
- Set (example):
- IP Address: 192.168.1.2
- Subnet Mask: 255.255.255.0
- Router can be left with the default IP.
- Click OK.
- On the eMotion LV1 Classic Console:
Note: If your devices are connected through a router with DHCP, they will automatically receive IP addresses. However, we recommend using a Static IP configuration to ensure the IP address remains consistent over time. If you choose to use Automatic IP with a DHCP server instead, be aware that the IP address may change periodically. In such cases, you would need to retrieve the current IP address by checking the device's network settings and re-configure your rtpMIDI session accordingly.
Set up the rtpMIDI session on your computer
Windows:
- Download, install and run rtpMIDI on your computer.
- Under ‘My Sessions’ (top left) click on the + icon to create a new session.
- Under ‘Sessions’ (top right) checkmark ‘Enabled’.
- Select the appropriate MIDI driver from the Live Routing dropdown menu. Depending on your configuration, you can choose either:
- A virtual MIDI driver such as LoopMIDI needs to be installed and used to route MIDI data from an application to the rtpMIDI session.
- A physical MIDI device driver (if you want to send MIDI from a connected physical device to the rtpMIDI session).
- If you are sending MIDI messages from an application (and not from a physical MIDI device), make sure to assign the correct MIDI driver in the application’s MIDI OUT settings.
- In rtpMIDI, under ‘Directory’ click on the + icon (bottom left) to establish a connection.
- In the ‘Add Remote Peer’ window:
- Under ‘Name’: Type in a desired name (i.e. Classic)
- Under ‘Hostname / IP-Address’ type in the IP Address of the eMotion LV1 Classic Console. For example: 192.168.1.1
- Under ‘Port’ type in 5004
- Click OK

- Under ‘Directory’ select the Remote peer connection you just created (i.e. Classic) and click ‘Connect’. – Before doing so, it is recommended to have rtpMIDI already running on the console (not mandatory).
- Click on the Spotlight (top right), search for Audio MIDI Setup and access it.
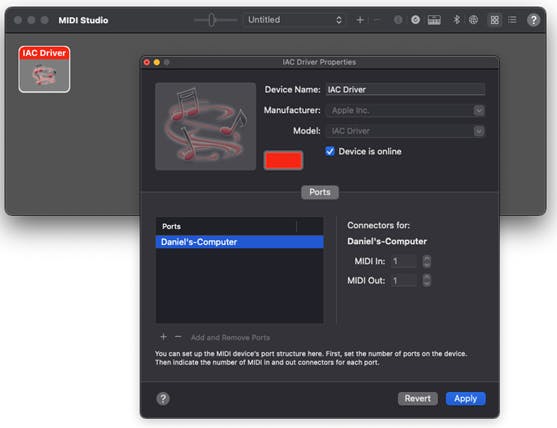
- Enable the IAC Driver (macOS’s virtual MIDI driver):
- In the MIDI Studio window, double-click the IAC Driver.
- In the Properties window, select Device is online to turn on the driver.
- To set up the MIDI ports, do any of the following:
- Click the + icon (bottom left) to add ports.
- Double-click the bus in the list to give it a new name (not mandatory).
- Click Apply.
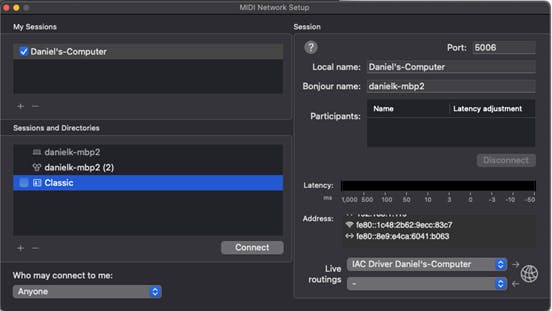
- Set up the MIDI Network Setup configuration:
- In the MIDI Studio window, click on the Globe Icon (top right) to open the MIDI network Setup

- Under ‘My Sessions’ (top left) click on the + icon to create a session.
- Under ‘My Sessions’ (top right) checkmark the session you just created.
- Select the appropriate MIDI driver from the Live Routing dropdown menu.
Depending on your configuration, you can choose either:- The IAC Driver you created.
- A physical MIDI device driver (if you want to send MIDI from a connected physical device to the rtpMIDI session).
- In the MIDI Studio window, click on the Globe Icon (top right) to open the MIDI network Setup
- If you are sending MIDI messages from an application (and not from a physical MIDI device), make sure to assign the correct MIDI driver in the application’s MIDI OUT settings.
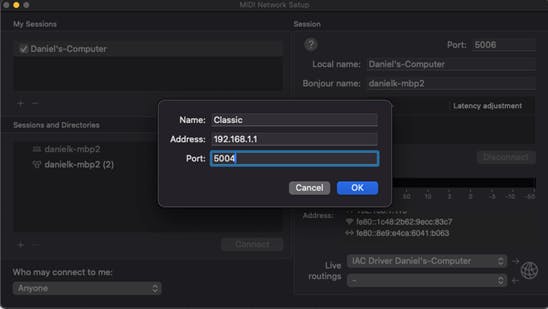
- Under ‘Directory’ click on the + icon (bottom left).
- In the ‘Add Remote Peer’ window:
- Under ‘Name’: Type in a desired name (i.e Classic)
- Under ‘Hostname / IP-Address’ type in the IP Address of the eMotion LV1 Classic Console. For example: 192.168.1.1
- Under ‘Port’ type in 5004
- Click OK
- Under ‘Directory’ select the Remote peer connection you just created (i.e Classic) and click ‘Connect’. – Before doing so, it is recommended to have rtpMIDI already running on the console (not mandatory).
macOS:
Verify that a connection has been established succesfully
- On the eMotion LV1 Classic console, access rtpMIDI.
- You should see your computer listed under the ‘Participants’ list.
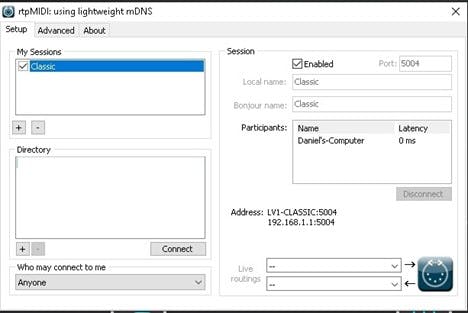 This indicates that a connection between the computer and the eMotion LV1 Classic console has been successfully established.
Establish a MIDI connection in eMotion LV1 Classic console
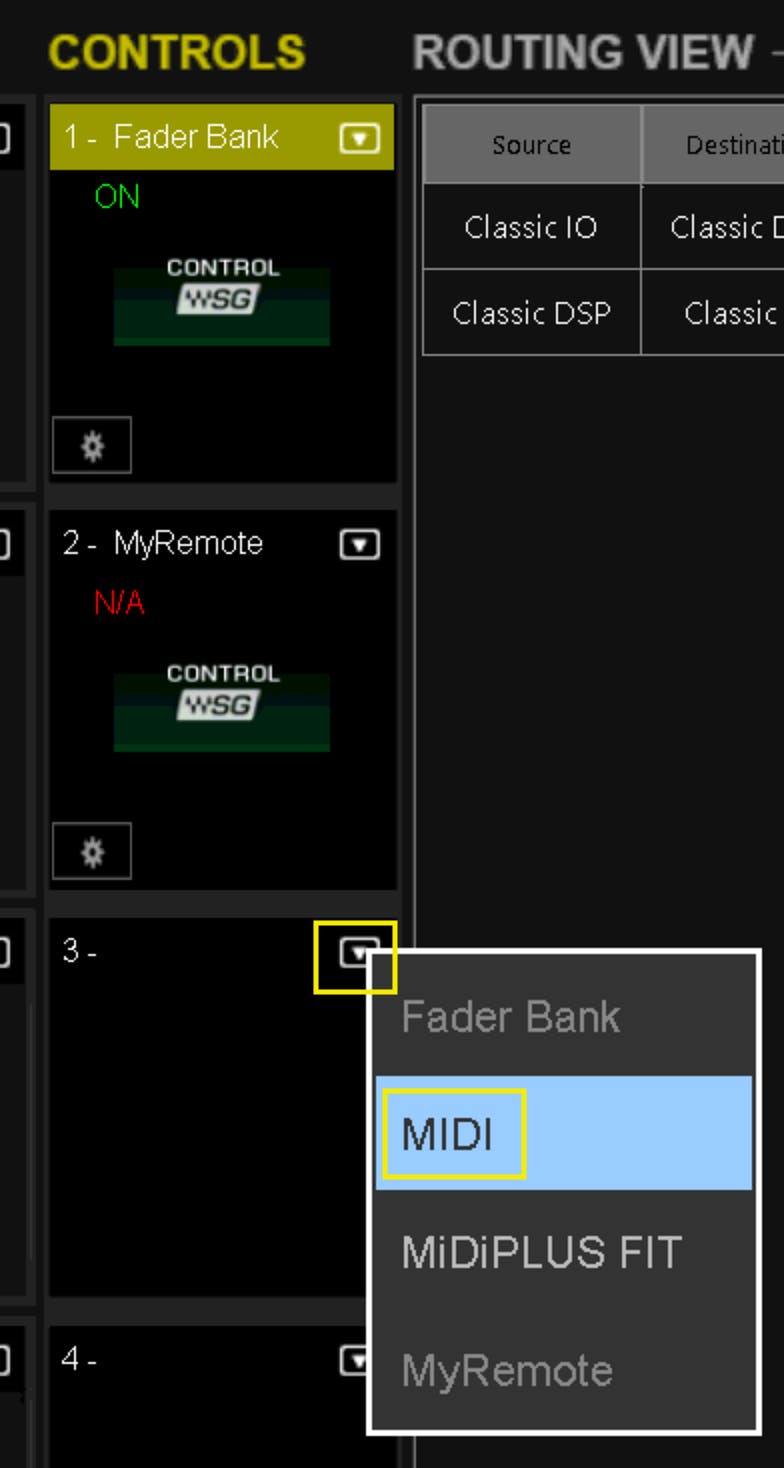
- Go to eMotion LV1’s SETUP > System Inventory page.
- Under Controls go to an empty slot, click on the dropdown menu icon and select MIDI.
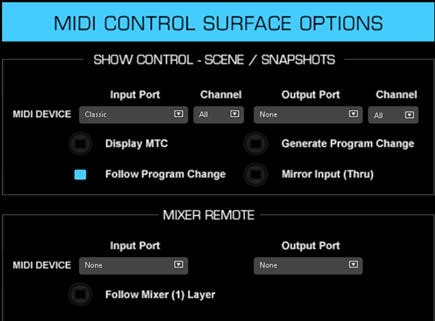
- Click on the cogwheel icon

- In the MIDI window:
- In the MIDI Input drop-down, select the rtpMIDI session’s midi driver.
- Check ‘Follow Program Change Messages’.
- Go to eMotion LV1’s SHOW > Scenes page and create scenes.
- On your computer, ensure that the application or device sending MIDI messages is configured to send Program Change messages in the format described below.
eMotion LV1 will trigger scene changes in response to MIDI Program Change messages as follows:
- First Bank (Scenes 1–128)
- Bank: 0
- Program Change: 0–127
- Second Bank (Scenes 129–256)
- Bank: 1
- Program Change: 0–127
Note: Program Change numbers correlate with the scenes list index.
For example:
- To trigger Scene 1, send: Bank: 0, Program Change: 0
- To trigger Scene 129, send: Bank: 1, Program Change: 0
Please Note: Waves cannot assist with configuration and setup of your computer or network.
Return to eMotion LV1 Knowledge Base
Need any assistance? contact our Technical Support team.