SoundGrid Studio: How to Stream Audio between Your DAW and a SoundGrid Interface
Learn how to use the SoundGrid Studio application to stream multi-channel audio between your DAW and a SoundGrid audio interface.
Learn how to use the free SoundGrid QRec application to record and play back multi-channel live recordings using your SoundGrid audio interfaces and DAW.
What You Need
- A computer running Windows or Mac (see system requirements), with the SoundGrid Studio installed and licensed on the computer (or on a USB flash drive).
- If the computer does not have an Ethernet port, an approved Ethernet adapter.
- A SoundGrid audio interface
- One supported Ethernet cable
(Please note: This setup is the most basic SoundGrid setup available. You can scale it up by adding a SoundGrid-compatible network switch, more SoundGrid audio interfaces, more computers to stream audio to and from, and a SoundGrid server to offload plugin processing.)
Hardware Connections
- Using a supported Ethernet cable, connect the SoundGrid interface to your computer’s Ethernet port (or adapter). Make sure the interface is turned on.
- Connect any microphones, instruments, monitors and/or headphones you wish to use to the SoundGrid interface. Make sure they are all powered and turned on.
SoundGrid Studio Configuration
The first time you launch SoundGrid Studio, the Auto-Config Wizard will automatically scan the network and configure your system. Here’s what it will do:
- It will identify the host computer’s LAN port. If more than one valid LAN port is available, you will be prompted to choose the correct one. If you cannot identify the correct network port, please refer to this support article.
- It will scan the network for devices and assign them to your system inventory. Notice the “Add to SoundGrid Studio?” prompt at the top right of your screen, asking to add the device to the SoundGrid Network. In this case you should see just one prompt for your SoundGrid audio interface: click ‘Yes’ to add it.
- The Wizard will also update any device firmware if needed. When an audio interface firmware update is finished, you will be prompted to turn the device off and on: please do so.
- The Wizard will then patch the inputs and outputs of all hardware and software interfaces (the SoundGrid driver), depending on the order in which the system identified the devices, and the order in which you clicked ‘Yes’ to add them to SoundGrid Studio.
By default, the Auto-Config Wizard will assign SoundGrid Driver Channels 1 and 2 to the SoundGrid Studio Control Room. This configuration requires a SoundGrid server in order to pass audio.
Since the above ‘minimal’ setup does not include a server, you will need to perform a small manual adjustment in order to patch playback audio from your DAW to the SoundGrid audio interface:
Note: If you press ‘Auto-Config’ after our initial setup and receive a ‘Select Your Monitor Output’ prompt – select Channels 1 & 2 and continue with the steps below:
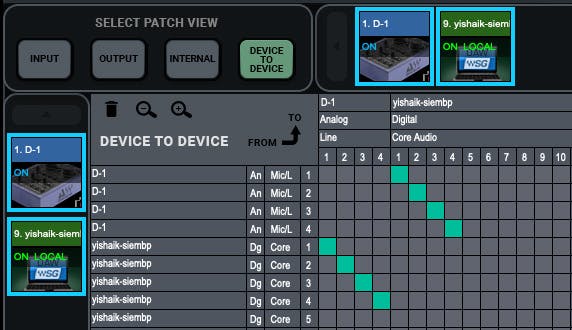
- Go to the Patch page > Device to Device view, and click both SoundGrid I/O boxes (in blue) to display them in the patch.
- Manually patch SoundGrid Driver Channels 1 and 2 to SoundGrid I/O Channels 1 and 2, with a diagonal cascade continuing down and to the right. It should look like this:
Once done, you will have a fully working SoundGrid system streaming multi-channel audio between your DAW and your SoundGrid audio interface.
If SoundGrid Studio encounters configuration or other issues, prompts will guide you to the appropriate solutions.
- You can view the devices and their settings in the Setup Page.
- You can save and manage your sessions in the top left ‘hamburger’ menu.
DAW Configuration
- Launch your DAW and access its audio settings dialog.
- Select ‘Waves SoundGrid’ as the ASIO (Windows) or Core Audio (Mac) driver, for input and output where applicable.
- On macOS, go to Settings > Security & Privacy > Privacy tab and check ‘SoundGrid Core Audio Service’ to give access to any microphone: Learn more.
- Access your DAW’s I/O setup or configuration and refresh it to reflect the new inputs and outputs from the SoundGrid Driver.
- Set up mono or stereo tracks to record in your DAW, and assign channels coming in from the SoundGrid Driver. Configure your host application’s outputs as necessary:
- If you wish to mix or sum these channels in your DAW and stream a stereo output back to the SoundGrid interface, set the outputs to the default 1-2.
- If you wish to mix or sum these channels on a console or a different DAW, set the outputs to individual channels or pairs of channels as desired.
- If you wish to record, arm the tracks in your DAW and record the audio incoming from your SoundGrid interface.
- Play back audio from your DAW via your SoundGrid interface’s outputs.
For more advanced information on networking audio, streaming audio between DAWs, or mixing DAW outputs using SoundGrid Studio, refer to the SoundGrid Studio user guide.
Need more assistance? Contact Waves Technical Support.