How to set up your new Waves Combo
These instructions will guide you through the process of connecting your Combo hardware and installing the latest software updates.
To proceed, you must first register your products. If you purchased from a dealer, register your combo package at Waves.com.
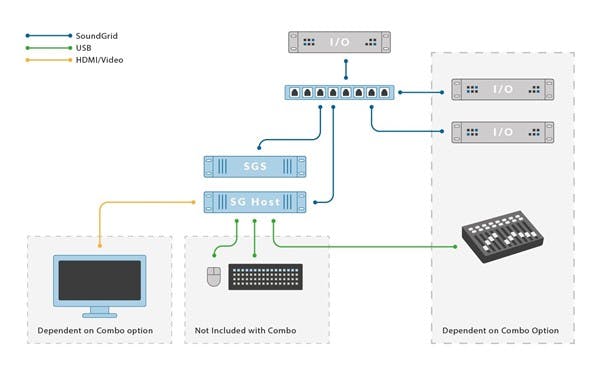
Let’s start with physically connecting your devices:
- Connect all the included devices in your Combo package to a power source, using their respective IEC power cables.
- Connect the SoundGrid I/O and SoundGrid Server to the network switch, using compatible Ethernet cables at supported lengths and then power them up.
- Connect the Waves host computer’s dedicated SoundGrid etherCON port to the network switch via compatible Ethernet cables at supported lengths.
If your combo does not include Waves host computer, learn how to identify the correct SoundGrid port here. - Connect your mouse and keyboard to the USB ports of the host computer.
- Connect your computer to the internet.
- Power up the computer and connect it to the internet.
Important: Do not connect the SoundGrid switch to the internet!
Activating licenses and updating software:
- Once the Waves host computer is up and running, launch Waves Central (Desktop > Waves Central).
At first launch, Waves Central may perform an automatic update—this can take several minutes. - Log in to Waves Central with your account credentials.
- Go to Licenses > Not Activated and choose the license/s that you want to activate.
- Click Activate. This will activate the licenses for Waves software on your computer.
*If you already have a USB key that stores your Waves licenses, you can skip this step. If you wish to activate your licenses to a USB key instead of the Waves host computer, simply change the target device before activating, or move licenses to the USB key at a later time. - If Updates Available appears at the top of the Waves Central screen, free software updates are available for your existing software version.
- Click Update to install it.
- Once finished, restart the computer.
- Updating to the latest version is recommended but not mandatory.
Setting up SoundGrid:
All SoundGrid components included in this package should be connected to the included 1Gbps network switch via compatible Ethernet cables at supported lengths.
The Waves host computer should connect to the SoundGrid network via the dedicated SoundGrid etherCON port.- Once devices are connected, powered up, and all software has been activated and updated, you can launch eMotion LV1.
- In the Setup > Inventory page of either application, select and assign the correct LAN port for the SoundGrid network.
- Axis One: Intel(R) Ethernet Connection I219-V
- Axis Proton: Realtek PCIe GBE Family Controller
- Axis Scope: Intel(R) Ethernet Connection I219-V
All devices connected to the SoundGrid network can now be assigned in eMotion LV1’s inventory page.
Some devices (I/Os and Server) may have a pending firmware update (Blue FW button).
A Red FW button indicates that the firmware must be updated for the device to function.- Click the FW button in the device slot, then click Update.
- Once the FW update has finished, reboot the device.
You have now finished setting up the system, and you can begin to configure audio routing etc.
Visit the eMotion LV1 Knowledge Base page for support notes, tutorials, online courses and various articles and troubleshooters.
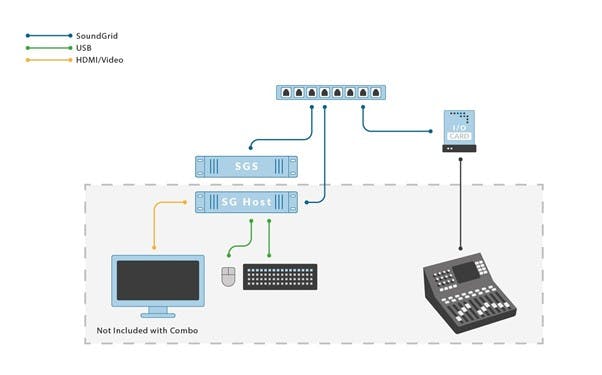
Let’s start with physically connecting your devices:
- Connect all the included devices in your Combo package to a power source, using their respective IEC power cables.
- Connect the SoundGrid I/O and SoundGrid Server to the network switch, using compatible Ethernet cables at supported lengths and then power them up.
- Connect your host computer to the network switch via compatible Ethernet cables at supported lengths.
- Connect your mouse and keyboard to your host computer.
- Power up your host computer and connect it to the internet.
Important: Do not connect the SoundGrid switch to the internet.
Activate and Install SuperRack SoundGrid and plugin licenses / updating software:
- Launch Waves Central (Desktop > Waves Central).
At first launch, Waves Central may perform an automatic update—this can take several minutes. - Log in to Waves Central with your account credentials.
- Click the Install Products page. This displays a list of your products and their install status.
- Select the My Products tab to view registered Waves applications and plugins, for which you have a license.
- Select the products you wish to install from either list, and review the selections in the Summary section.
- Click on the Install button. If you are activating licenses as well, the button will read Install and Activate.
- If Updates Available appears at the top of the Waves Central screen, free software updates are available for your existing software version.
- Click Update to install it.
- Once finished, restart the computer.
- Updating to the latest version is recommended but not mandatory.
Setting up SuperRack SoundGrid SoundGrid:
All SoundGrid components included in this package should be connected to the included 1Gbps network switch via compatible Ethernet cables at supported lengths.
- Once devices are connected, powered up, and all software has been activated and updated, you can launch SuperRack SoundGrid.
- In the Setup > Inventory page of either application, select and assign the correct LAN port for the SoundGrid network.
- All devices connected to the SoundGrid network can now be assigned in SuperRack SoundGrid’s inventory page.
Some devices (I/Os and Server) may have a pending firmware update (Blue FW button).
A Red FW button indicates that the firmware must be updated for the device to function.- Click the FW button in the device slot, then click Update.
- Once the FW update has finished, reboot the device.
You have now finished setting up the system, and you can begin to configure audio routing etc.
Visit the SuperRack SoundGrid Knowledge Base for support notes, tutorials, online courses and various articles and troubleshooters.
In addition, our Waves technical support team is available to assist you with any inquiry you might have. Contact Technical Support.