How to control OVox Vocoder with MIDI in FL Studio
Apr 16, 2020
Learn how to set up and control the Waves OVox vocal synthesis / vocoder plugin with MIDI in FL Studio in order to achieve robotic vocals, morphing, harmonizing and talkbox effects.
- Import audio to a new FL Studio session. Double-click on the waveform, and set the Track to 1 to assign the audio to an audio track.
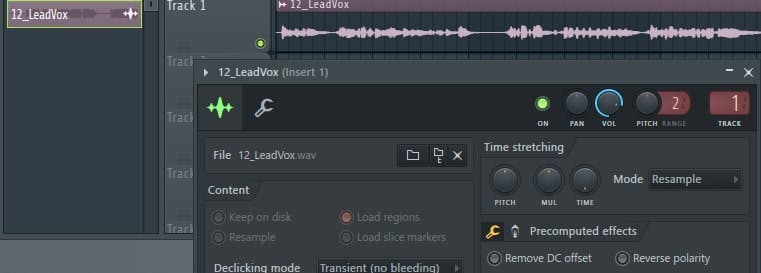
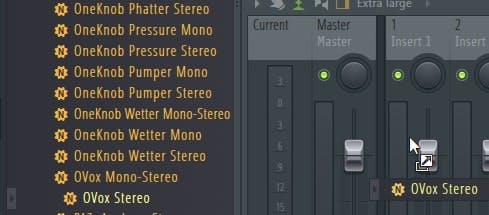
- Insert OVox on the track.
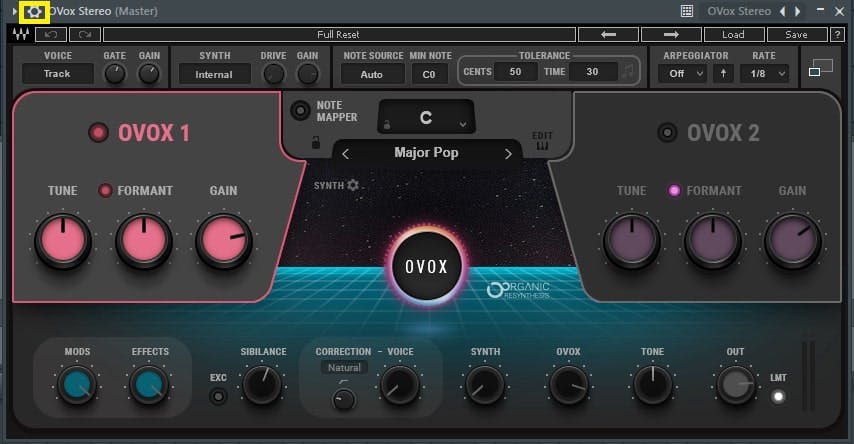
- To connect MIDI to the plugin, click the Gear Wheel symbol next to the plugin’s name.
- In the Settings window, set the MIDI port to 1.
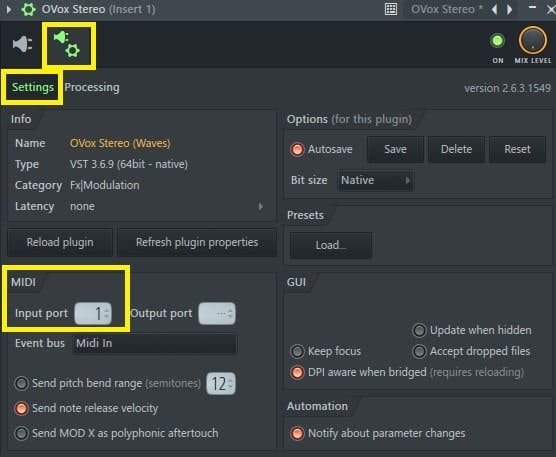
- Make sure that your MIDI controller is sending the MIDI at the same port that the plugin receives.
- Open Options in the FL Studio menu at the top right corner.

- Select the MIDI controller that you are using, and set the MIDI port to 1. Now the plugin receives MIDI from the desired controller.

- In OVox, make sure the Note Source is set to Auto or MIDI.

- Play audio and MIDI simultaneously for vocal synthesis / vocoder sounds, or load up a Synth preset.
false
false
This content is not available in your country.
PRODUCTION
547802ab-d90f-4dd8-968d-79a652306049
https://media.wavescdn.com
public
https://register.waves.com
b705eb6e-5be8-46d1-a9e3-8fbf47be7a04
y
<div class="msg-box text-left mb-12">You may find this content helpful: To be able to view it, <a href="/legal/cookie-notice-and-privacy-choices#customize" target="_top" title="">enable Functional Technologies</a>.</div>
True
False
44cf24db-d78d-41f5-953a-1f914338adcd
True
Start Free
true
true
false
voTekqO2wEJBRRQbsEWTHeJEaV5FbTWvet3JZATG
652445
6LeG-IcUAAAAAIb42eguHdUztlZNcrLPhuk81WSM
6LftoDMUAAAAAC9QpaYXNehGHSu__XxRJyFAIgkJ
6LeIxAcTAAAAAJcZVRqyHh71UMIEGNQ_MXjiZKhI
27
7
2026
23
2
41
80
30
#000000
#fff
#fff
#000
#e8e8e8
{
"before": [{
"text": "Waves Creative Access",
"link": "/subscriptions",
"design": "link"
}, {
"text": "Start free",
"link": "/subscriptions",
"design": "button"
}
],
"beforeOlm": [{
"text": "AI Mastering Online",
"link": "/online-mastering",
"design": "link"
}, {
"text": "Try Now",
"link": "/online-mastering",
"design": "button"
}
],
"topMenu": [{
"text": "Products",
"link": "/products",
"subMenu": [{
"sectionTitle": "Plugins",
"sectionItems": [{
"text": "Plugins",
"link": "/plugins",
"tagline": "Shape your mixes, masters and productions with award-winning plugins",
"icon": "plugins"
}, {
"text": "Bundles",
"link": "/bundles",
"tagline": "Save big on your favorite tools with our curated plugin collections",
"icon": "bundles"
}, {
"text": "Waves Creative Access",
"link": "/subscriptions",
"tagline": "Subscribe to the world’s biggest plugin collection: Try free for 7 days",
"icon": "creative-access"
}, {
"text": "StudioVerse",
"link": "/studioverse",
"tagline": "Access a massive online library of plugin chains directly from your DAW",
"icon": "studioverse"
}, {
"text": "Mixers & Racks",
"link": "/mixers-racks",
"tagline": "Mix with the Waves LV1 mixer console or supercharge your setup with real-time plugin racks",
"icon": "mixers-racks"
}, {
"text": "Waves Audio Courses",
"link": "/courses",
"tagline": "Level up your skills with courses taught by Grammy–winning engineers",
"icon": "courses"
}
]
}, {
"sectionTitle": "Online Services",
"sectionItems": [{
"text": "AI Mastering Online",
"link": "/online-mastering",
"tagline": "Master your tracks online with Grammy-winning AI technology ",
"icon": "olm"
}, {
"text": "Voice ReGen",
"link": "/voice-regen",
"tagline": "Remove Background Noise from Audio and Video w/ AI",
"icon": "illugen"
}, {
"text": "ILLUGEN",
"link": "/illugen",
"tagline": "AI text-to-sample engine: Generate sounds from your wild imagination",
"icon": "illugen"
}, {
"text": "Waves Stream",
"link": "/plugins/waves-stream",
"tagline": "Stream audio in real time when collaborating remotely",
"icon": "stream"
}
]
}, {
"sectionTitle": "Hardware",
"sectionItems": [{
"text": "eMotion LV1 Classic",
"link": "/mixers-racks/emotion-lv1",
"tagline": "",
"icon": "hardware"
}, {
"text": "SuperRack LiveBox",
"link": "/hardware/superrack-livebox",
"tagline": "",
"icon": "hardware"
}, {
"text": "SoundGrid Servers",
"link": "/hardware/soundgrid-servers",
"tagline": "",
"icon": "hardware"
}, {
"text": "SoundGrid Interfaces",
"link": "/hardware/soundgrid-interfaces",
"tagline": "",
"icon": "hardware"
}, {
"text": "System Builder",
"link": "/system-builder",
"tagline": "Customize your Waves system for live sound mixing",
"icon": "system-builder"
}, {
"text": "All Hardware",
"link": "/hardware",
"tagline": "Mix with the Waves LV1 Classic console or by adding real-time processing to any console",
"icon": "hardware"
}
]
}
]
}, {
"text": "Solutions",
"link": "/solutions",
"subMenu": [{
"sectionTitle": "Studio",
"sectionItems": [{
"text": "Plugins",
"link": "/plugins",
"tagline": "Shape your mixes, masters and productions with award-winning plugins",
"icon": "plugins"
}, {
"text": "Bundles",
"link": "/bundles",
"tagline": "Save big on your favorite tools with our curated plugin collections",
"icon": "bundles"
}, {
"text": "Waves Creative Access",
"link": "/subscriptions",
"tagline": "Subscribe to the world’s biggest plugin collection: Try free for 7 days",
"icon": "creative-access"
}, {
"text": "AI Mastering Online",
"link": "/online-mastering",
"tagline": "Master your tracks online with Grammy-winning AI technology ",
"icon": "olm-blue"
}, {
"text": "StudioVerse",
"link": "/studioverse",
"tagline": "Access a massive online library of plugin chains directly from your DAW",
"icon": "studioverse"
}, {
"text": "Voice ReGen",
"link": "/voice-regen",
"tagline": "Remove Background Noise from Audio and Video w/ AI",
"icon": "illugen"
}, {
"text": "ILLUGEN",
"link": "/illugen",
"tagline": "AI text-to-sample engine: Generate sounds from your wild imagination",
"icon": "illugen-blue"
}
]
}, {
"sectionTitle": "Live Sound",
"sectionItems": [{
"text": "Live Sound",
"link": "/live-sound",
"tagline": "Bring studio-quality sound to live events of any size",
"icon": "live-sound"
}, {
"text": "Houses of Worship",
"link": "/houses-of-worship",
"tagline": "Deliver crystal-clear sound to every seat and every stream, trusted by churches worldwide",
"icon": "how"
}, {
"text": "Broadcast Audio",
"link": "/broadcast-audio",
"tagline": "Mix superior broadcast sound, including cloud-based solutions",
"icon": "broadcast"
}
]
}, {
"sectionTitle": "Consumer Audio",
"sectionItems": [{
"text": "Waves Maxx",
"link": "https://maxx.com",
"tagline": "Enhance laptops, tablets, and speakers with studio-grade audio technology",
"icon": "maxx"
}
]
}
]
}, {
"text": "Downloads",
"link": "/downloads",
"subMenu": [{
"sectionTitle": "Downloads",
"sectionItems": [{
"text": "Waves Central",
"link": "/downloads/central",
"tagline": "Download Waves Central to install or update Waves products",
"icon": "central"
}, {
"text": "All Downloads",
"link": "/downloads",
"tagline": "Browse all available downloads",
"icon": "all-downloads"
}
]
}
]
}, {
"text": "Support",
"link": "/support ",
"subMenu": [{
"sectionTitle": "Support",
"sectionItems": [{
"text": "Install & Activate Products",
"link": "/support/activate",
"tagline": "Get help with the installation and activation of Waves products",
"icon": "install-activate"
}, {
"text": "System Requirements",
"link": "/support/tech-specs/system-requirements",
"tagline": "Review specs to ensure full compatibility with Waves products",
"icon": "system-req"
}, {
"text": "All Support Articles",
"link": "/support",
"tagline": "Explore tips, how-to guides, and troubleshooting in our knowledge base",
"icon": "support-articles"
}, {
"text": "Contact Us",
"link": "/contact-us",
"tagline": "Need help? Our world-class support team is here for you",
"icon": "contact-us"
}
]
}
]
}, {
"text": "Learn",
"link": "/learn",
"subMenu": [{
"sectionTitle": "",
"sectionItems": [{
"text": "Videos",
"link": "/videos",
"tagline": "Watch quick tutorials and deep-dive walkthroughs",
"icon": "videos"
}, {
"text": "Blog",
"link": "/blog",
"tagline": "Read expert insights, tips, and creative techniques",
"icon": "blog"
}, {
"text": "By Topic",
"link": "/tags",
"tagline": "Explore content by category",
"icon": "by-topic"
}, {
"text": "Courses",
"link": "/courses",
"tagline": "Level up your skills with courses taught by Grammy–winning engineers",
"icon": "courses-red"
}
]
},
{
"sectionTitle": "",
"sectionItems": [{
"text": "News",
"link": "/news",
"tagline": "Catch the latest updates and releases from Waves",
"icon": "news"
}, {
"text": "Artists",
"link": "/artists",
"tagline": "See the top creators that use Waves in their sessions",
"icon": "artists"
}, {
"text": "Events",
"link": "/events",
"tagline": "Find out where Waves is showing up live and online",
"icon": "events"
}, {
"text": "Forum",
"link": "https://forum.waves.com",
"tagline": "Join the conversation with fellow producers and engineers",
"icon": "forum"
}
]
}
]
}, {
"text": "Specials",
"link": "/specials"
}
]
}
{
"topMenu": [{
"id": "products",
"tabName": "Products",
"tabIcon": "<svg width='16' height='16' viewBox='0 0 16 16' fill='none' xmlns='http://www.w3.org/2000/svg'><path d='M14.1197 0.5C14.882 0.5 15.5 1.11797 15.5 1.88027V14.1197C15.5 14.882 14.882 15.5 14.1197 15.5H1.88027C1.11797 15.5 0.5 14.882 0.5 14.1197V1.88027C0.5 1.11797 1.11797 0.5 1.88027 0.5H14.1197ZM5.29545 3.22727C5.10718 3.22727 4.95455 3.3799 4.95455 3.56818L4.95442 8.07832C4.58286 8.23241 4.32168 8.59723 4.32168 9.02273C4.32168 9.44823 4.58286 9.81304 4.95442 9.96713L4.95455 11.75C4.95455 11.9383 5.10718 12.0909 5.29545 12.0909C5.48373 12.0909 5.63636 11.9383 5.63636 11.75L5.63644 10.0051C6.06461 9.88161 6.37762 9.48854 6.37762 9.02273C6.37762 8.55692 6.06461 8.16384 5.63644 8.04033L5.63636 3.56818C5.63636 3.3799 5.48373 3.22727 5.29545 3.22727ZM10.4773 3.22727C10.289 3.22727 10.1364 3.3799 10.1364 3.56818L10.136 4.57048C9.76272 4.72378 9.5 5.08948 9.5 5.51623C9.5 5.94299 9.76272 6.30869 10.136 6.46199L10.1364 11.75C10.1364 11.9383 10.289 12.0909 10.4773 12.0909C10.6656 12.0909 10.8182 11.9383 10.8182 11.75L10.8181 6.49767C11.2445 6.3731 11.5559 5.98085 11.5559 5.51623C11.5559 5.05162 11.2445 4.65937 10.8181 4.53479L10.8182 3.56818C10.8182 3.3799 10.6656 3.22727 10.4773 3.22727Z' fill='white'/></svg>",
"sections": [{
"id": "products-1",
"orientation": "horizontal",
"type": "topLink",
"sectionItems": [{
"text": "Waves Creative Access",
"link": "/subscriptions",
"type": "before"
}, {
"text": "Start Free",
"link": "/subscriptions",
"design": "button",
"type": "before"
}, {
"text": "AI Mastering Online",
"link": "/online-mastering",
"type": "beforeOlm"
}, {
"text": "Try Now",
"link": "/online-mastering",
"design": "button",
"type": "beforeOlm"
}
]
}, {
"id": "products-2",
"sectionItems": [{
"text": "Specials",
"link": "/specials"
}, {
"text": "Plugins",
"link": "/plugins"
}, {
"text": "Bundles",
"link": "/bundles"
}, {
"text": "Waves Creative Access",
"link": "/subscriptions"
}, {
"text": "AI Mastering Online",
"link": "/online-mastering"
}, {
"text": "StudioVerse",
"link": "/studioverse"
}, {
"text": "Voice ReGen",
"link": "/voice-regen"
}, {
"text": "ILLUGEN",
"link": "/illugen"
}, {
"text": "Mixers & Racks",
"link": "/mixers-racks"
}, {
"text": "Hardware",
"link": "/hardware"
}, {
"text": "Courses",
"link": "/courses"
}, {
"text": "System Builder",
"link": "/system-builder"
}
]
}
]
}, {
"id": "solutions",
"tabName": "Solutions",
"tabIcon": "<svg width='17' height='16' viewBox='0 0 17 16' fill='none' xmlns='http://www.w3.org/2000/svg'><path d='M15.6614 5.71376L11.0526 5.04573L8.99067 0.881534C8.73882 0.372807 8.01109 0.372837 7.75925 0.881534L5.69741 5.04576L1.08857 5.71379C0.525445 5.79542 0.300608 6.48526 0.708078 6.88123L4.04289 10.1219L3.25601 14.6984C3.15988 15.2575 3.74857 15.6838 4.25226 15.4199L8.32742 13.2595L12.4503 15.4198C13.0013 15.6838 13.59 15.2574 13.4939 14.6984L12.7071 10.1219L16.0419 6.88114C16.4494 6.4852 16.2246 5.79536 15.6614 5.71376Z' fill='#C8C8C8'/></svg>",
"sections": [{
"id": "solutions-1",
"sectionTitle": "Studio",
"sectionItems": [{
"text": "Waves Creative Access",
"link": "/subscriptions"
}, {
"text": "AI Mastering Online",
"link": "/online-mastering"
}, {
"text": "StudioVerse",
"link": "/studioverse"
}, {
"text": "Voice ReGen",
"link": "/voice-regen"
}, {
"text": "ILLUGEN",
"link": "/illugen"
}
]
}, {
"id": "solutions-2",
"sectionTitle": "Live sound",
"sectionItems": [{
"text": "Live Sound",
"link": "/live-sound"
}, {
"text": "Houses of Worship",
"link": "/houses-of-worship"
}, {
"text": "Broadcast Audio",
"link": "/broadcast-audio"
}
]
}, {
"id": "solutions-3",
"sectionTitle": "Consumer Audio",
"sectionItems": [{
"text": "Waves Maxx",
"link": "https://maxx.com"
}
]
}
]
}, {
"id": "downloads",
"tabName": "Downloads",
"tabIcon": "<svg width='20' height='20' viewBox='0 0 20 20' fill='none' xmlns='http://www.w3.org/2000/svg'><path fillRule='evenodd' clipRule='evenodd' d='M16.3023 3.71452C16.7781 4.19553 17.0869 4.81721 17.1812 5.48753C17.3934 6.9823 17.5 8.48996 17.5 9.99987C17.5 11.518 17.394 13.0344 17.1812 14.5374C17.0805 15.2066 16.7664 15.826 16.2853 16.3023C15.8043 16.7781 15.1826 17.0869 14.5123 17.1812C13.0176 17.3934 11.5099 17.5 9.99998 17.5C8.48181 17.5 6.96545 17.394 5.46244 17.1812C4.79324 17.0805 4.1739 16.7664 3.69752 16.2853C3.22173 15.8043 2.91294 15.1826 2.8186 14.5123C2.3938 11.5105 2.3938 8.46426 2.8186 5.46244C2.91939 4.79324 3.23346 4.1739 3.71452 3.69752C4.19553 3.22173 4.81721 2.91294 5.48753 2.8186C8.48936 2.3938 11.5356 2.3938 14.5374 2.8186C15.2066 2.91939 15.826 3.23346 16.3023 3.71452ZM9.98965 6.27462C9.69548 6.27462 9.43949 6.49659 9.43949 6.79156V10.2629L8.67255 9.56203C8.57091 9.46284 8.43171 9.40927 8.289 9.40927C8.14684 9.40927 8.00816 9.46243 7.90662 9.56089C7.79974 9.65457 7.73777 9.78689 7.73777 9.92719C7.73777 10.0681 7.8003 10.201 7.90808 10.2948L9.60589 11.8599C9.70756 11.9593 9.84685 12.0129 9.98965 12.0129C10.1325 12.0129 10.2718 11.9592 10.3734 11.8599L12.0726 10.2935C12.2906 10.0926 12.2906 9.76181 12.0726 9.56092C11.8606 9.36548 11.5201 9.3656 11.308 9.56092L10.5398 10.2629V6.79156C10.5398 6.49659 10.2838 6.27462 9.98965 6.27462ZM7.61239 13.2247C7.42949 13.2247 7.24507 13.2555 7.10386 13.3569C6.95469 13.464 6.875 13.6341 6.875 13.8624C6.875 14.0734 6.96018 14.228 7.11008 14.3226C7.24983 14.4107 7.43143 14.4375 7.61239 14.4375H12.3878C12.569 14.4375 12.754 14.4106 12.8975 14.3238C13.051 14.2309 13.1438 14.077 13.1438 13.8624C13.1438 13.6309 13.0571 13.4612 12.9037 13.3555C12.7586 13.2556 12.5709 13.2247 12.3878 13.2247H7.61239Z' fill='#C8C8C8'/></svg>",
"sections": [{
"id": "downloads-1",
"sectionItems": [{
"text": "Waves Central",
"link": "/downloads/central"
}, {
"text": "All Downloads",
"link": "/downloads"
}
]
}
]
}, {
"id": "support",
"tabName": "Support",
"tabIcon": "<svg width='15' height='14' viewBox='0 0 15 14' fill='none' xmlns='http://www.w3.org/2000/svg'><path d='M0.334961 2.66849C0.334961 1.37891 1.30871 0.333496 2.50989 0.333496H12.2331C13.4343 0.333496 14.4081 1.37891 14.4081 2.66849V9.12405C14.4081 10.4136 13.4343 11.459 12.2331 11.459H2.50989C1.30871 11.459 0.334961 10.4136 0.334961 9.12405V2.66849Z' fill='#C8C8C8'/><path d='M1.34381 13.5681C0.89844 13.8475 0.340081 13.5011 0.339202 12.9449L0.333009 9.02784C0.3322 8.51517 0.812515 8.16486 1.25258 8.35717L4.93655 9.96713C5.45211 10.1924 5.5025 10.9593 5.0216 11.261L1.34381 13.5681Z' fill='#C8C8C8'/></svg>",
"sections": [{
"id": "support-1",
"sectionItems": [{
"text": "Install & Activate Products",
"link": "/support/activate"
}, {
"text": "System Requirements",
"link": "/support/tech-specs/system-requirements"
}, {
"text": "All Support Articles",
"link": "/support"
}, {
"text": "Contact Us",
"link": "/contact-us"
}
]
}
]
}, {
"id": "learn",
"tabName": "Learn",
"tabIcon": "<svg width='19' height='15' viewBox='0 0 19 15' fill='none' xmlns='http://www.w3.org/2000/svg'><path d='M18.112 5.59106L18.9349 5.16679L9.88397 0.5L0.833008 5.16683L9.88397 9.83359L16.8778 6.22745V9.02294C16.7502 9.17096 16.6721 9.36449 16.6721 9.57668C16.6721 10.0399 17.0412 10.4167 17.4949 10.4167C17.9487 10.4167 18.3178 10.0399 18.3178 9.57668C18.3178 9.36445 18.2397 9.17096 18.1121 9.02294V5.59106H18.112Z' fill='#C8C8C8'/><path d='M9.88425 11.1788L4.31445 8.2915V11.9359C4.31445 13.444 6.80814 14.6665 9.88425 14.6665C12.9604 14.6665 15.4541 13.444 15.4541 11.9359V8.2915L9.88425 11.1788Z' fill='#C8C8C8'/></svg>",
"sections": [{
"id": "learn-1",
"sectionItems": [{
"text": "Videos",
"link": "/videos"
}, {
"text": "Blog",
"link": "/blog"
}, {
"text": "By Topic",
"link": "/tags"
}, {
"text": "Courses",
"link": "/courses"
}, {
"text": "News",
"link": "/news"
}, {
"text": "Artists",
"link": "/artists"
}, {
"text": "Events",
"link": "/events"
}, {
"text": "Forum",
"link": "https://forum.waves.com"
}
]
}
]
}, {
"id": "specials",
"tabName": "Specials",
"tabIcon": "<svg xmlns='http://www.w3.org/2000/svg' width='20' height='20' xml:space='preserve' baseProfile='tiny' overflow='visible' viewBox='0 0 20 20'><g fill='#C8C8C8'><path d='m19.26 10.61-9.19-9.17c-.33-.33-.76-.6-1.31-.83C8.21.38 7.71.27 7.26.27H1.92c-.45 0-.83.16-1.16.49-.33.32-.49.71-.49 1.15v5.34c0 .45.11.95.34 1.5.23.55.5.98.83 1.3l9.19 9.2c.32.32.7.48 1.16.48.44 0 .83-.16 1.17-.48l6.31-6.32c.32-.32.48-.7.48-1.16-.02-.44-.18-.83-.49-1.16zm-11.46.35c-.68.68-1.79.68-2.48 0-.68-.68-.68-1.79 0-2.48.68-.68 1.79-.68 2.48 0 .69.69.69 1.8 0 2.48zm2.99 2.92a.36.36 0 0 1-.21.11.385.385 0 0 1-.44-.32L8.99 6.61c-.04-.21.11-.41.32-.45.21-.03.41.11.44.32l1.15 7.06c.02.14-.02.26-.11.34zm3.43-2.42c-.68.68-1.79.68-2.48 0-.68-.68-.68-1.79 0-2.48.68-.68 1.79-.68 2.48 0 .68.69.68 1.8 0 2.48z'/><path d='M5.88 9.04c-.38.38-.38.99 0 1.38.38.38 1 .38 1.37 0 .38-.38.38-1 0-1.37a.957.957 0 0 0-1.37-.01zM12.3 9.54c-.38.38-.38 1 0 1.38.38.38.99.38 1.37 0 .38-.38.38-.99 0-1.38-.38-.38-1-.38-1.37 0z'/></g></svg>",
"url": "/specials",
"sections": [{
"id": "specials-1",
"sectionItems": [{
"text": "Specials",
"link": "/specials"
}
]
}
]
}, {
"id": "account",
"hasMembership": true,
"tabName": "Account",
"tabIcon": "<svg width='16' height='16' viewBox='0 0 16 16' fill='none' xmlns='http://www.w3.org/2000/svg'><mask id='mask0_1996_2457' style='mask-type: alpha;' maskUnits='userSpaceOnUse' x='0' y='0' width='16' height='16'><path d='M11.4709 3.95356C11.4709 5.8615 9.9277 7.40712 8.02278 7.40712C6.11787 7.40712 4.57471 5.8615 4.57471 3.95356C4.57471 2.04562 6.11787 0.5 8.02278 0.5C9.9277 0.5 11.4709 2.04562 11.4709 3.95356ZM7.86732 9.12903C10.7972 9.12903 14.3026 10.3499 15.236 12.3551C15.3901 12.6338 15.4738 12.931 15.4738 13.2448V14.6638C15.4738 15.0557 15.1015 15.3733 14.6423 15.3733C14.1831 15.3733 13.8108 15.0557 13.8108 14.6638L13.8109 13.985C13.6783 13.8329 13.5975 13.6306 13.5975 13.4086C13.5975 12.9067 13.09 12.3938 12.3154 11.9597C11.1472 11.4669 9.47713 11.1163 7.9906 11.1163C5.89132 11.1163 3.42594 11.8156 2.52376 12.6257L2.4851 12.6616C2.33791 12.8236 2.23298 12.9892 2.17896 13.1553C2.173 13.1853 2.17037 13.2151 2.17037 13.2448C2.17037 13.3126 2.15923 13.3781 2.13844 13.4402L2.13718 14.5209C2.13718 14.9936 2.09991 15.5 1.53225 15.5C0.96459 15.5 0.5 15.3234 0.5 14.8507V13.4086C0.5 13.34 0.502698 13.2722 0.508013 13.205L0.507443 13.2448C0.507443 13.0197 0.550483 12.8033 0.631498 12.596C1.34489 10.4481 4.82186 9.12903 7.86732 9.12903Z' fill='white'/></mask><g mask='url(#mask0_1996_2457)'><path d='M11.4709 3.95356C11.4709 5.8615 9.9277 7.40712 8.02278 7.40712C6.11787 7.40712 4.57471 5.8615 4.57471 3.95356C4.57471 2.04562 6.11787 0.5 8.02278 0.5C9.9277 0.5 11.4709 2.04562 11.4709 3.95356ZM7.86732 9.12903C10.7972 9.12903 14.3026 10.3499 15.236 12.3551C15.3901 12.6338 15.4738 12.931 15.4738 13.2448V14.6638C15.4738 15.0557 15.1015 15.3733 14.6423 15.3733C14.1831 15.3733 13.8108 15.0557 13.8108 14.6638L13.8109 13.985C13.6783 13.8329 13.5975 13.6306 13.5975 13.4086C13.5975 12.9067 13.09 12.3938 12.3154 11.9597C11.1472 11.4669 9.47713 11.1163 7.9906 11.1163C5.89132 11.1163 3.42594 11.8156 2.52376 12.6257L2.4851 12.6616C2.33791 12.8236 2.23298 12.9892 2.17896 13.1553C2.173 13.1853 2.17037 13.2151 2.17037 13.2448C2.17037 13.3126 2.15923 13.3781 2.13844 13.4402L2.13718 14.5209C2.13718 14.9936 2.09991 15.5 1.53225 15.5C0.96459 15.5 0.5 15.3234 0.5 14.8507V13.4086C0.5 13.34 0.502698 13.2722 0.508013 13.205L0.507443 13.2448C0.507443 13.0197 0.550483 12.8033 0.631498 12.596C1.34489 10.4481 4.82186 9.12903 7.86732 9.12903Z' fill='#C8C8C8'/></g><path fillRule='evenodd' clipRule='evenodd' d='M0.846525 12.8439C4.29332 10.6091 6.65657 9.4917 7.93629 9.4917C9.21729 9.4917 11.5906 10.5246 15.0564 12.5905L15.0562 12.5907C15.2648 12.7159 15.3992 12.9349 15.4165 13.1775C15.4543 13.7212 15.4731 14.2333 15.4731 14.7139C15.4731 14.7231 15.4731 14.7322 15.4731 14.7413C15.4724 15.1534 15.1376 15.4869 14.7255 15.4862C14.6552 15.486 14.5853 15.476 14.5091 15.4862C10.0093 15.4862 6.53019 15.4862 4.07177 15.4862C2.79023 15.4862 1.85097 15.4862 1.25401 15.4862C0.842136 15.4867 0.507733 15.1534 0.506836 14.7415V13.4697C0.50696 13.2171 0.634848 12.9818 0.846525 12.8439Z' fill='#C8C8C8'/></svg>",
"sections": [{
"id": "account-1",
"sectionTitle": "My Account",
"sectionItems": [{
"text": "Account",
"link": "/account"
}, {
"text": "My Products",
"link": "/account/products"
}, {
"text": "Plugins Picked for Me",
"link": "/my-recommended-products"
}, {
"text": "My Upgrades",
"link": "/account/upgrades"
}, {
"text": "Get Waves Update Plan",
"link": "/account/get-waves-update-plan"
}, {
"text": "Get Latest Version",
"link": "/account/get-latest-version"
}, {
"text": "Register New Products",
"link": "/account/register"
}, {
"text": "Register Upgrade",
"link": "/account/register-upgrade"
}, {
"text": "Register Second Licenses",
"link": "/account/register-second-licenses"
}, {
"text": "My Certifications",
"link": "/account/certifications"
}, {
"text": "Wish List",
"link": "/account/wishlist"
}
]
}, {
"id": "account-2",
"sectionTitle": "Free Stuff",
"sectionItems": [{
"text": "My Coupons",
"link": "/coupons"
}, {
"text": "My Rewards",
"link": "/account/rewards"
}, {
"text": "My Events",
"link": "/account/events"
}
]
}, {
"id": "account-3",
"sectionTitle": "Settings",
"sectionItems": [{
"text": "Personal Details",
"link": "/account/edit-personal-details"
}, {
"text": "StudioVerse Profile",
"link": "/account/edit-my-creator-profile"
}, {
"text": "About Me",
"link": "/account/profile"
}, {
"text": "Change Password",
"link": "/account/change-password"
}, {
"text": "Email Preferences",
"link": "/email-preferences"
}, {
"text": "My Credit Cards",
"link": "/account/credit-cards"
}, {
"text": "My Invoices",
"link": "/account/invoices"
}
]
}
]
}
]
}
[
[{
"text": "My Account",
"isTitle": true
}, {
"text": "Account",
"link": "/account"
}, {
"text": "My Products",
"link": "/account/products"
}, {
"text": "Plugins Picked for Me",
"link": "/my-recommended-products"
}, {
"text": "My Upgrades",
"link": "/account/upgrades"
}, {
"text": "Get Waves Update Plan",
"link": "/account/get-waves-update-plan"
}, {
"text": "Get Latest Version",
"link": "/account/get-latest-version"
}, {
"text": "Register New Products",
"link": "/account/register"
}, {
"text": "Register Upgrade",
"link": "/account/register-upgrade"
}, {
"text": "Register Second Licenses",
"link": "/account/register-second-licenses"
}, {
"text": "My Certifications",
"link": "/account/certifications"
}, {
"text": "Wish List",
"link": "/account/wishlist"
}, {
"text": "Free Stuff",
"isTitle": true,
"classes": "mt-4"
}, {
"text": "My Coupons",
"link": "/coupons"
}, {
"text": "My Rewards",
"link": "/account/rewards"
}, {
"text": "My Events",
"link": "/account/events"
}
],
[{
"text": "Settings",
"isTitle": true
}, {
"text": "Personal Details",
"link": "/account/edit-personal-details"
}, {
"text": "StudioVerse Profile",
"link": "/account/edit-my-creator-profile"
}, {
"text": "About Me",
"link": "/account/profile"
}, {
"text": "Change Password",
"link": "/account/change-password"
}, {
"text": "Email Preferences",
"link": "/email-preferences"
}, {
"text": "My Credit Cards",
"link": "/account/credit-cards"
}, {
"text": "My Invoices",
"link": "/account/invoices"
}
]
]
[{"bannerGUID":"445bb4b8-a985-4e4d-88b2-5b44cc9b3e9f","bannerDisplayName":"Atlas Reverb Release - July 2026","bannerTypeGUID":"dd5f8368-6b03-465f-b570-48baddb35b08","typeName":"OfferFooter","bannerImage":"/images/footer-offer/2026/july/atlas-reverb-release-july-2026.jpg","bannerURL":"/plugins/atlas-reverb","bannerPriority":1,"bannerTitle":"Introducing: Atlast Reverb","gaValue":"atlas-reverb-release-july-2026"},{"bannerGUID":"2e76fc8a-3a6d-4461-8d47-240c619ea29b","bannerDisplayName":"Your Studio Fully Loaded Sale - July 2026","bannerTypeGUID":"dd5f8368-6b03-465f-b570-48baddb35b08","typeName":"OfferFooter","bannerImage":"/images/footer-offer/2026/july/your-studio-fully-loaded-sale-july-2026.jpg","bannerURL":"/plugins","bannerPriority":2,"bannerTitle":"Your Studio Fully Loaded Sale","gaValue":"your-studio-fully-loaded-sale-july-2026"},{"bannerGUID":"a04448ca-692d-465a-94b9-b9c04bcfd552","bannerDisplayName":"Free Plugin Bonus - July 2026","bannerTypeGUID":"dd5f8368-6b03-465f-b570-48baddb35b08","typeName":"OfferFooter","bannerImage":"/images/footer-offer/2026/july/buy-2-get-2-sale-july-2026.jpg","bannerURL":"/free-plugins-buy-2-get-2-free-july-2026","bannerPriority":3,"bannerTitle":"Buy 2 Get 2 Free Sale : Shop Plugins","gaValue":"buy-2-get-2-sale-july-2026"},{"bannerGUID":"d4286ff5-e6de-4b2f-8bc9-e96a46843f09","bannerDisplayName":"V17 - June 2026","bannerTypeGUID":"dd5f8368-6b03-465f-b570-48baddb35b08","typeName":"OfferFooter","bannerImage":"/images/footer-offer/2026/june/v17-offer-june-2026.jpg","bannerURL":"/v17","bannerPriority":4,"bannerTitle":"New! V17","gaValue":"v17-offer-june-2026"},{"bannerGUID":"e9238c9a-ec9b-4669-b6c9-12a38974902a","bannerDisplayName":"My Recommended Products","bannerTypeGUID":"dd5f8368-6b03-465f-b570-48baddb35b08","typeName":"OfferFooter","bannerImage":"/images/footer-offer/2023/november/my-recommended-products-bf.jpg","bannerURL":"/my-recommended-products","bannerPriority":6,"bannerTitle":"Personal Product Recommendations: See Products","gaValue":"my-recommended-products"},{"bannerGUID":"e6b77202-75d8-4086-b586-af00dc3c289a","bannerDisplayName":"Upgrades","bannerTypeGUID":"dd5f8368-6b03-465f-b570-48baddb35b08","typeName":"OfferFooter","bannerImage":"/images/footer-offer/2023/september/upgrades.jpg","bannerURL":"/account/upgrades","bannerPriority":7,"bannerTitle":"Upgrade to a Bigger Bundle: See Upgrades","gaValue":"upgrade-to-a-bigger-bundle"}]
0
[{"itemOrder":1,"tierName":"Ultimate"},{"itemOrder":2,"tierName":"Essential"}]
{"itemID":2547696,"userID":65,"wcaVisitCount":0,"wcaVisitDayCount":0,"orderCount":0,"pluginCount":0,"hadWCA":false,"hasActiveWCA":false,"hasFreePack":false,"hasSBSPaymentIssue":false,"wcaRecurring":false,"persona":"wca-prospect","wcaTier":"","wcaPeriod":"","ltv":0,"cacheVersion":0}
0
True
True
bp-checkout.waves.com
[{"slot":7,"codeName":"CartWupMsgRenew2","testType":0,"variations":"wup-link:50, no-support:50","isActive":true,"masterSlotID":0},{"slot":10,"codeName":"HPHeroWCA","testType":0,"variations":"creative-access:25, one-subscription:25, test-drive:25,access-240:25","isActive":true,"masterSlotID":0},{"slot":21,"codeName":"CancelWCAPositive","testType":0,"variations":"old:50, positive:50","isActive":true,"masterSlotID":0},{"slot":23,"codeName":"CartOnSale","testType":0,"variations":"yes:50, no:50","isActive":true,"masterSlotID":0}]